

Getting Started & Setup
Get Started with Swivel Sync
New to Swivel Sync? Start here. This guide explains what Swivel Sync does and walks you through device setup, connecting carriers and institutions, linking login sources, and mapping values to Swivel Summary.
What is Swivel Sync?
Section titled “What is Swivel Sync?”Swivel Sync is a service available with Premier and Enterprise subscriptions. It securely connects to supported carrier and institution websites to automatically pull policy and account values and record them directly into your Swivel CRM.
What Swivel Sync Updates
Section titled “What Swivel Sync Updates”| Swivel Sync… | |
|---|---|
| DOES automatically update supported policy and account values | DOES NOT automatically create new policies or accounts in Swivel CRM |
| DOES detect when a policy is no longer found on the carrier portal website | DOES NOT update policy statuses (e.g. In Force, Surrendered) or policy dates |
| DOES update supported policy values regardless of the product name or type stored in Swivel CRM | DOES NOT create or update contribution or withdrawal transaction entries |
Device Shipping
Section titled “Device Shipping”Devices are shipped via FedEx Ground and usually arrive within 3 business days. You will be provided a tracking number once Swivel has shipped your device. Use it to track your order or Contact Sales for additional assistance.
Before You Get Started
Section titled “Before You Get Started”Confirm the following before beginning device setup. Meeting these requirements upfront prevents the most common sync issues.
Hardware
Section titled “Hardware”Your Swivel Sync device shipment includes:
- 1 Swivel Sync device
- 1 power cord
- 1 ethernet cable
You will also need:
- An internet connection and secure network
- Access to your router
- Access to an outlet near your wifi router
Permissions
Section titled “Permissions”An Owner and/or Manager user permission role in Swivel is required to complete device setup. Click here to learn more about 🔗 Swivel User Roles.
CRM Data Requirements
Section titled “CRM Data Requirements”Swivel Sync updates existing records in your CRM. It does NOT create new ones. For a policy or account to sync successfully, all three of the following must be TRUE:
| # | Requirement | Description |
|---|---|---|
| 1 | Policies and accounts in Swivel CRM | The policy or account must already be stored in Swivel and associated to a contact record. Swivel Sync will not pull in new records from the carrier website automatically. |
| 2 | Policy or account has product status indicator of Pending or Open | Each product status in Swivel has an underlying indicator. Only products set to a Pending or Open indicator are eligible to sync. |
| 3 | Policy or account number matches the carrier or institution website | The policy or account number stored in Swivel must match exactly how it appears on the carrier or institution website, including any leading zeros, spaces, or extra characters. Even a small difference will cause Swivel Sync to return a Not Found result. |
These three are configured before setup. The connected-institution and login-source requirements are addressed in the following step. See 🔗 What Makes a Policy Syncable for the full picture.
Step 1: Device Setup
Section titled “Step 1: Device Setup”Configure Device
Section titled “Configure Device”-
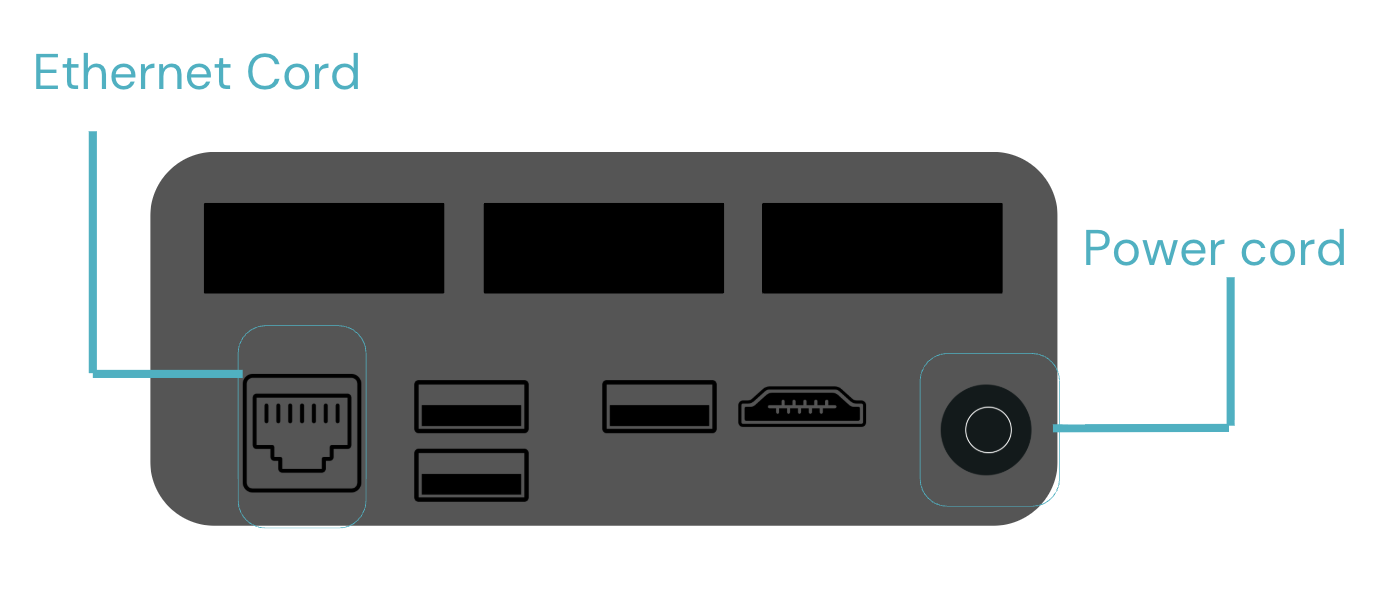
Plug in the power cord to the Swivel Sync device and to an outlet near your wifi router.
-
Plug in the ethernet cord to the Swivel Sync device and your wifi router.
Press power on the front of the device.
-
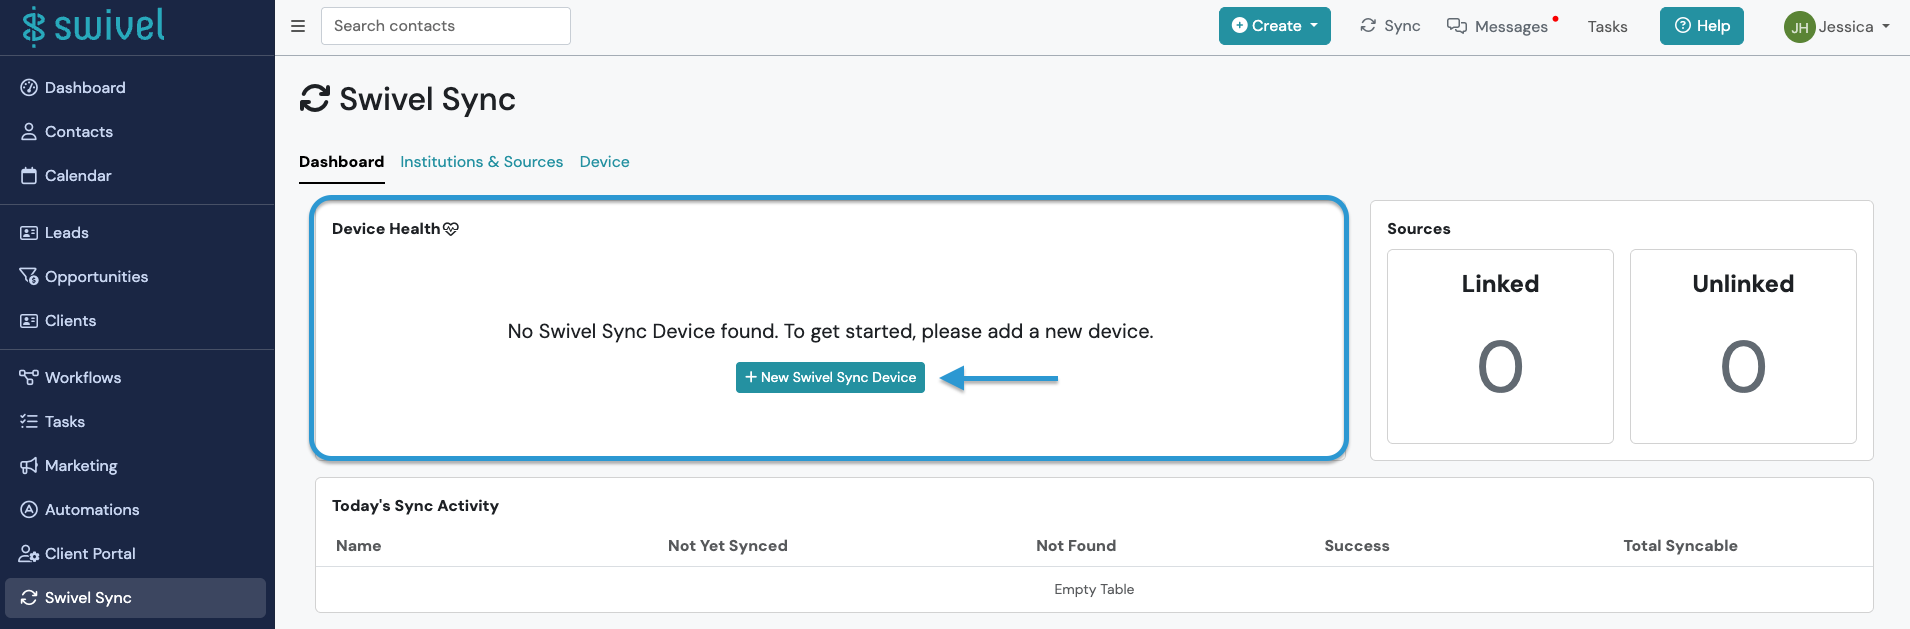
Log into your Swivel account at portal.swivelcrm.com
-
Navigate to the Swivel Sync tab on the left side navigation menu.
-
From the Dashboard tab > Device Health section > click +New Swivel Sync Device button.
-
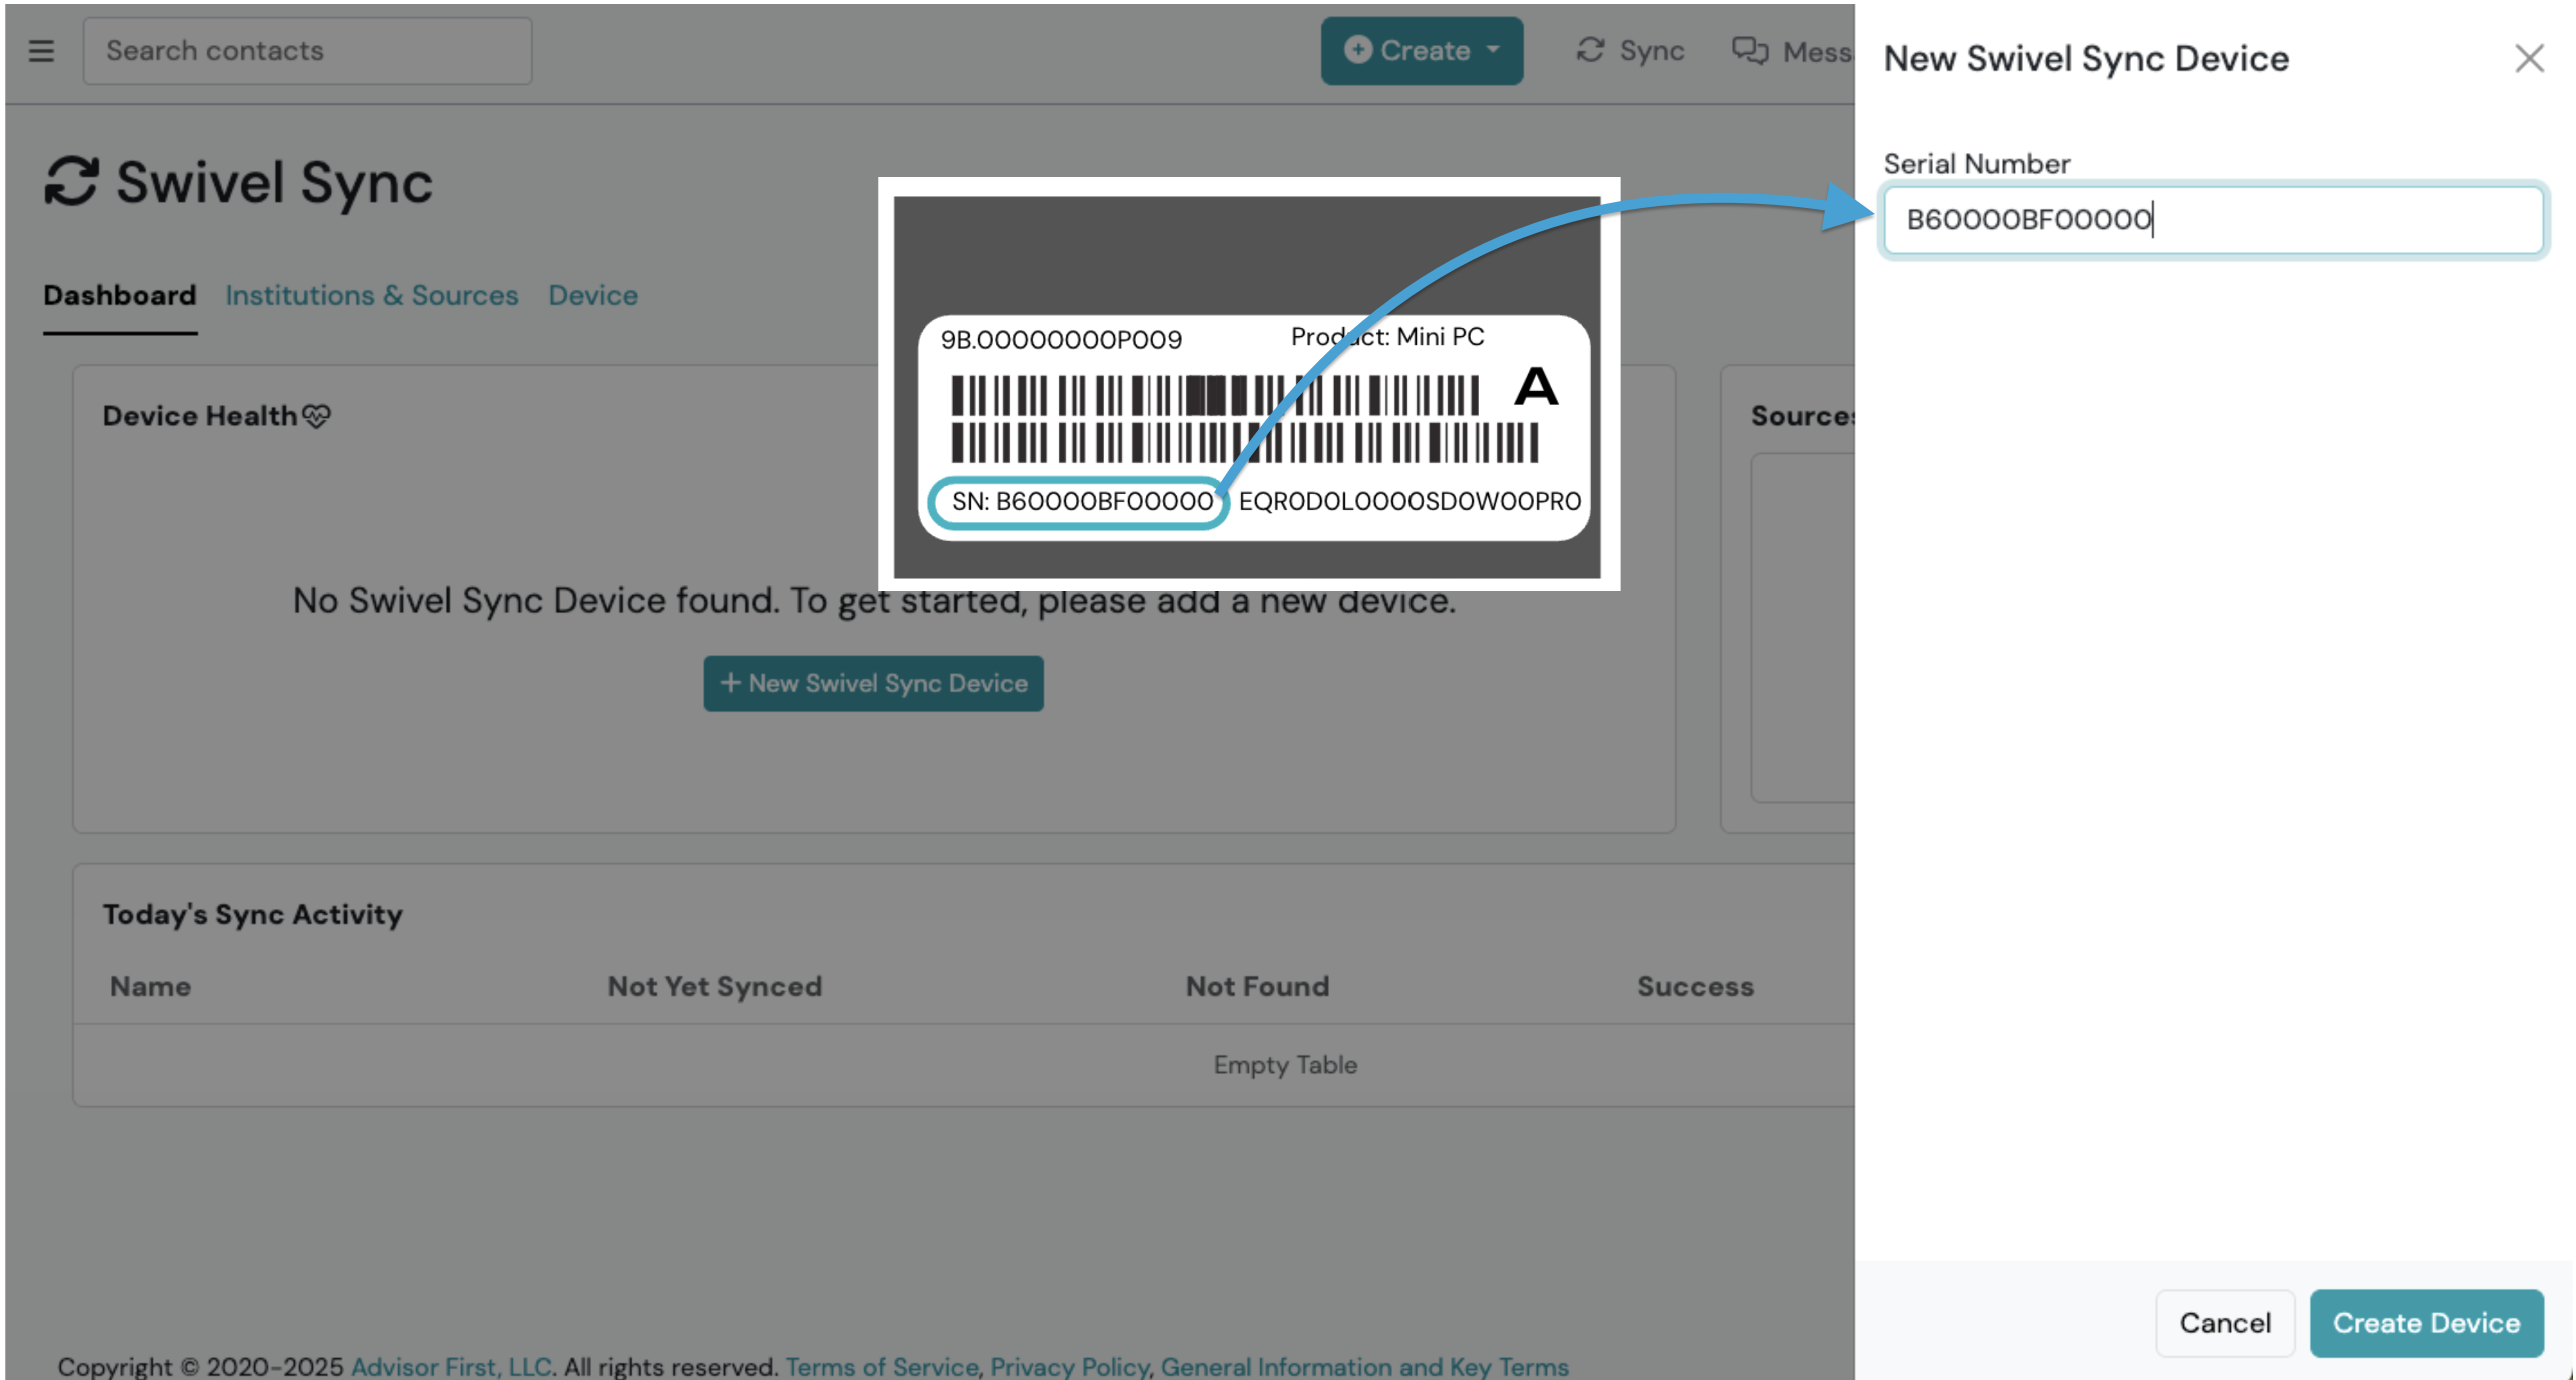
Locate the serial number on the bottom of your device and enter it exactly into the Serial Number field. ⚠️ Important: The serial number is case-sensitive.
-
Click Create Device.
Monitor Device Health
Section titled “Monitor Device Health”-
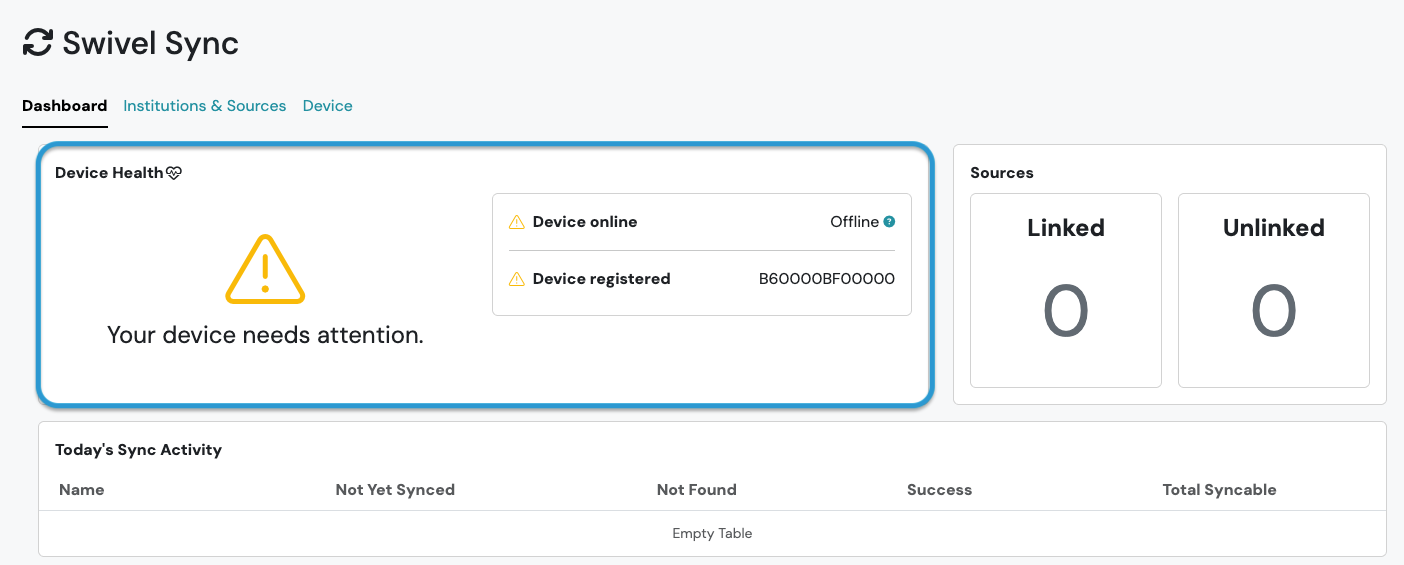
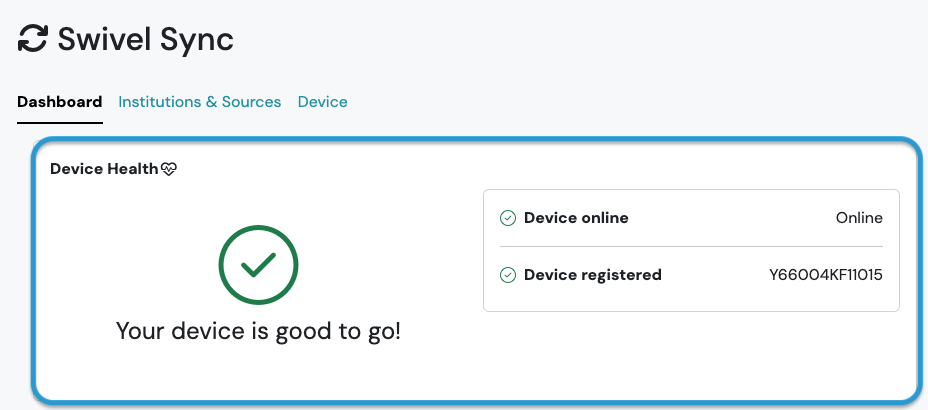
Navigate to the Dashboard > Device Health section and confirm your device is online.
-
You can also confirm your device is online by navigating to the Device tab > checking the Last Heartbeat.


Step 2: Connect an Institution & Add a Login Source
Section titled “Step 2: Connect an Institution & Add a Login Source”This step connects a carrier or institution to its Swivel Sync plugin and adds at least one (1) login source. For full definitions of connected institution and login source, see 🔗 Managing Connected Institutions and Login Sources.
-
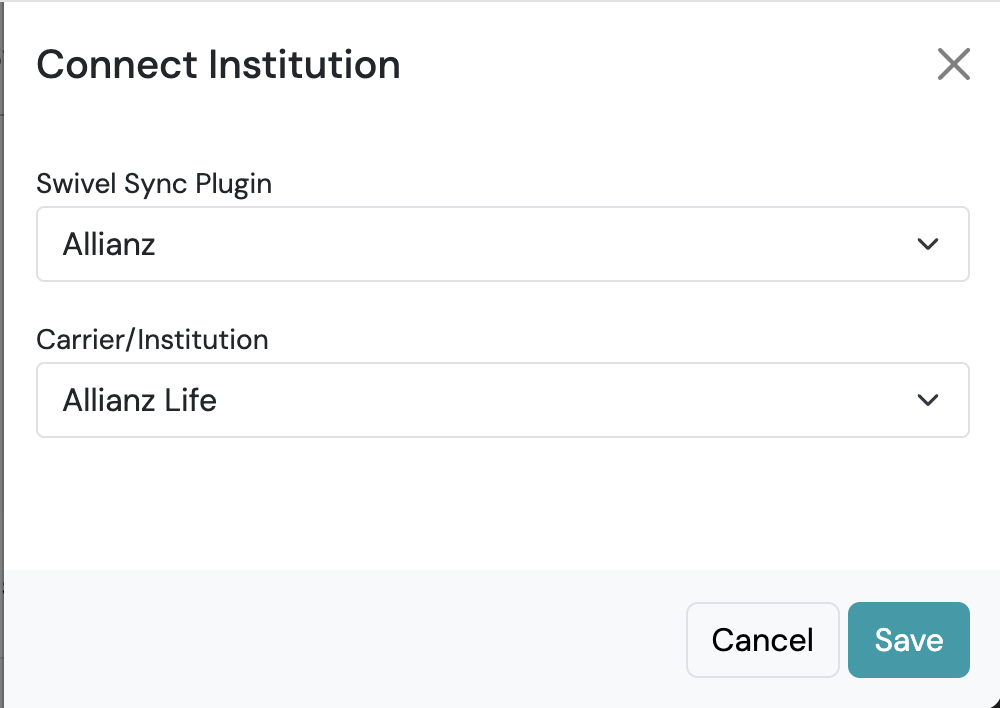
Navigate to the Institutions & Sources tab > click Connect Institution button.
-
Select a Swivel Sync Plugin.
-
Select the corresponding Carrier/Institution.
-
Click Save.

-
-
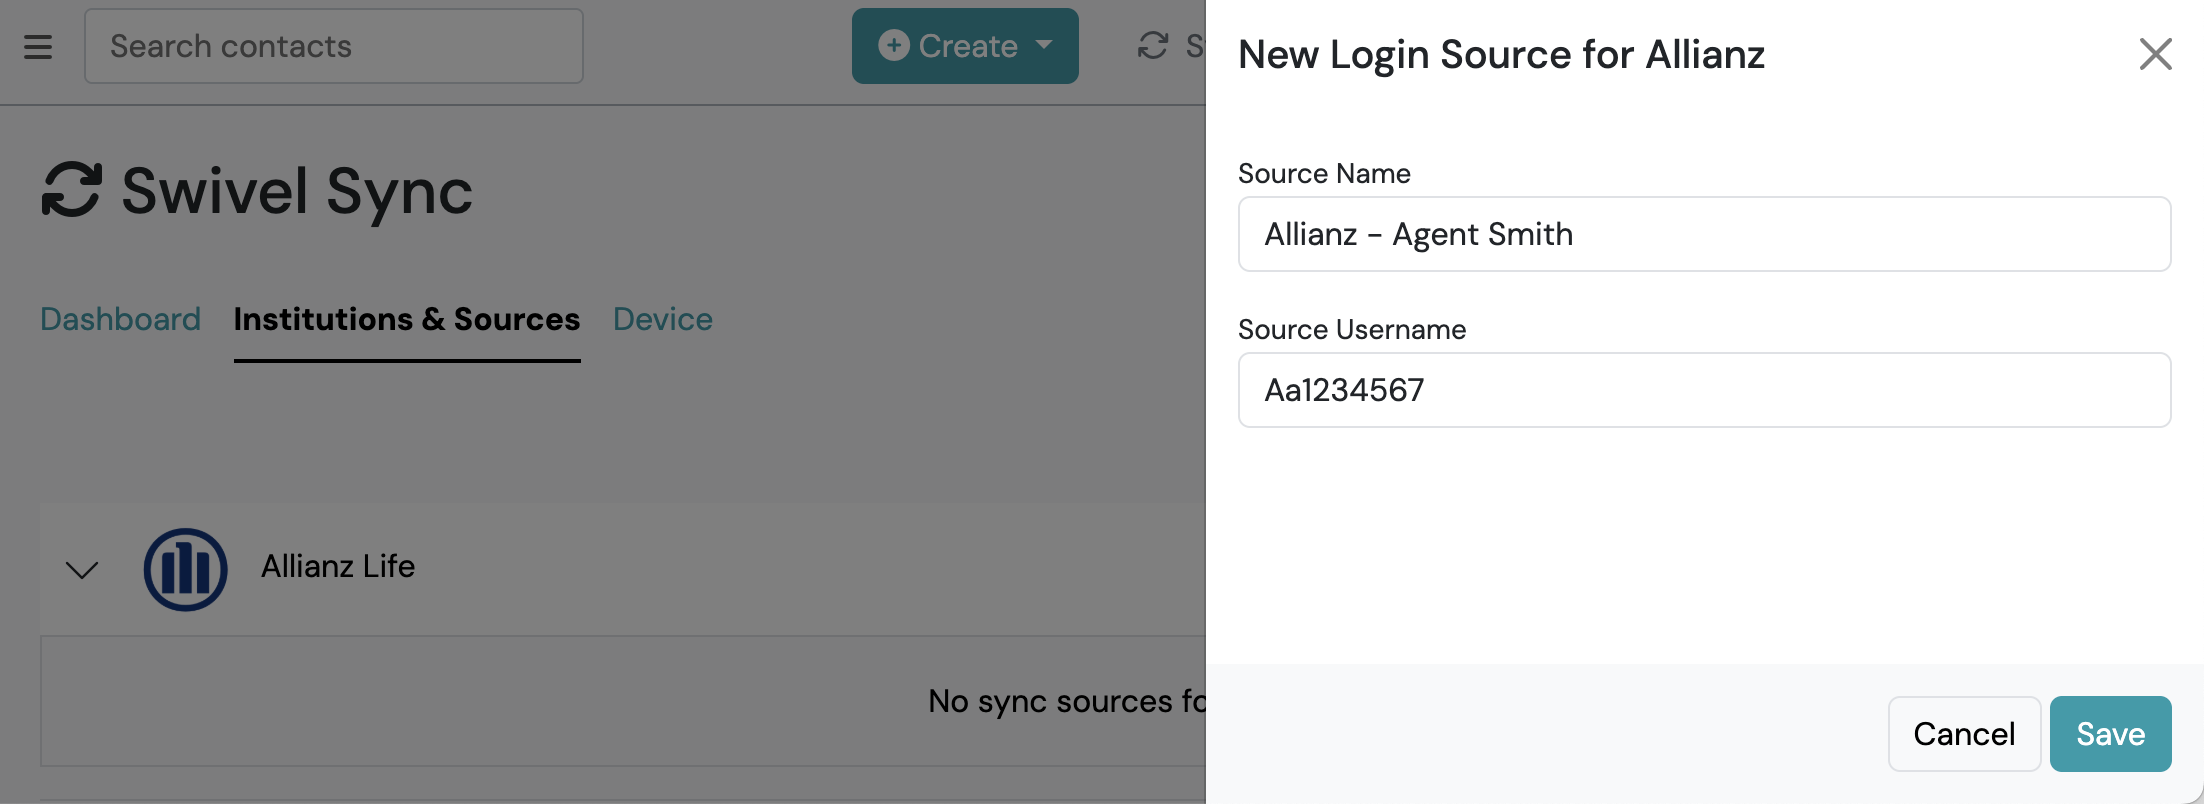
Once you connect an institution, you can now add the login source(s). From the Institutions & Sources tab > navigate to a connected institution > click the +Login Source icon.

-
Go to the Source Name field > Enter a descriptive name for the login source (e.g. Allianz - Agent Smith).
-
Go to Source Username > Enter the username associated with this login source.
-
Click Save.

-
Repeat steps 1–5 for each supported Swivel Sync carrier or institution you wish to sync.
Step 3: Link Sources to Swivel
Section titled “Step 3: Link Sources to Swivel”Once you’ve connected your supported carriers & institutions and created your Swivel Sync login sources, you’re ready to log in to each source using your agent or advisor institution credentials. Delegate access credentials may also be used.
When you click Link, Swivel opens the carrier or institution’s own login page in a window. You sign in there just as you would in your browser, including any verification step the carrier requires.
Link Sources
Section titled “Link Sources”-
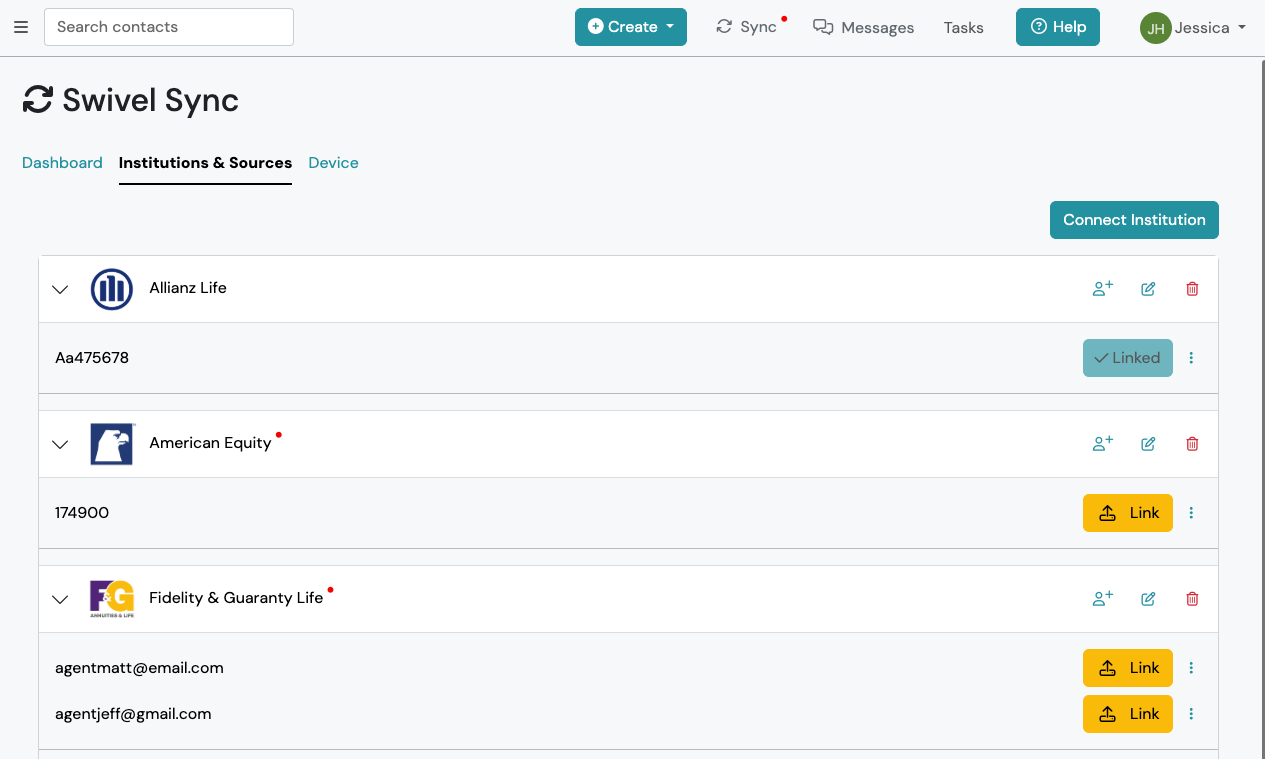
Access the Institutions & Sources tab to link your sources in either of the following ways:
-
From the top navigation bar, click the Sync button > Institutions & Sources
-
From the main navigation menu, click Swivel Sync > click Institutions & Sources tab
-
-
For each unlinked source, click the Link button.
-
A window opens showing the carrier or institution’s login page. Sign in with the username and password for this login source, just as you would on the carrier’s website.
-
For institutions that require 2-factor authentication, you will be prompted to enter the verification code sent by the institution.
-
If the carrier requires a verification step, such as a code sent by text or email, complete it on the carrier’s page.
-
Once the sign-in succeeds, click Done to close and exit the window. The source’s Link button changes to Linked.
-
Repeat steps 2–5 for all unlinked sources until the dashboard reflects all sources as Linked.
What to Expect After Your First Link
Section titled “What to Expect After Your First Link”Once a login source is linked, Swivel Sync builds a queue of every policy that source has access to and works through it in the background while the source remains linked. If you have multiple login sources for the same carrier, each one works its own queue independently.
Initial syncs typically complete within 1–5 days. How much of a source’s queue gets processed in a given day depends on three things:
- The carrier’s link session duration
- The number of syncable policies for that source
- How consistently the source stays linked throughout the day
If a source becomes unlinked while it’s working its queue, it picks up where it left off the next time it’s linked.
Step 4: Force Sync a Policy
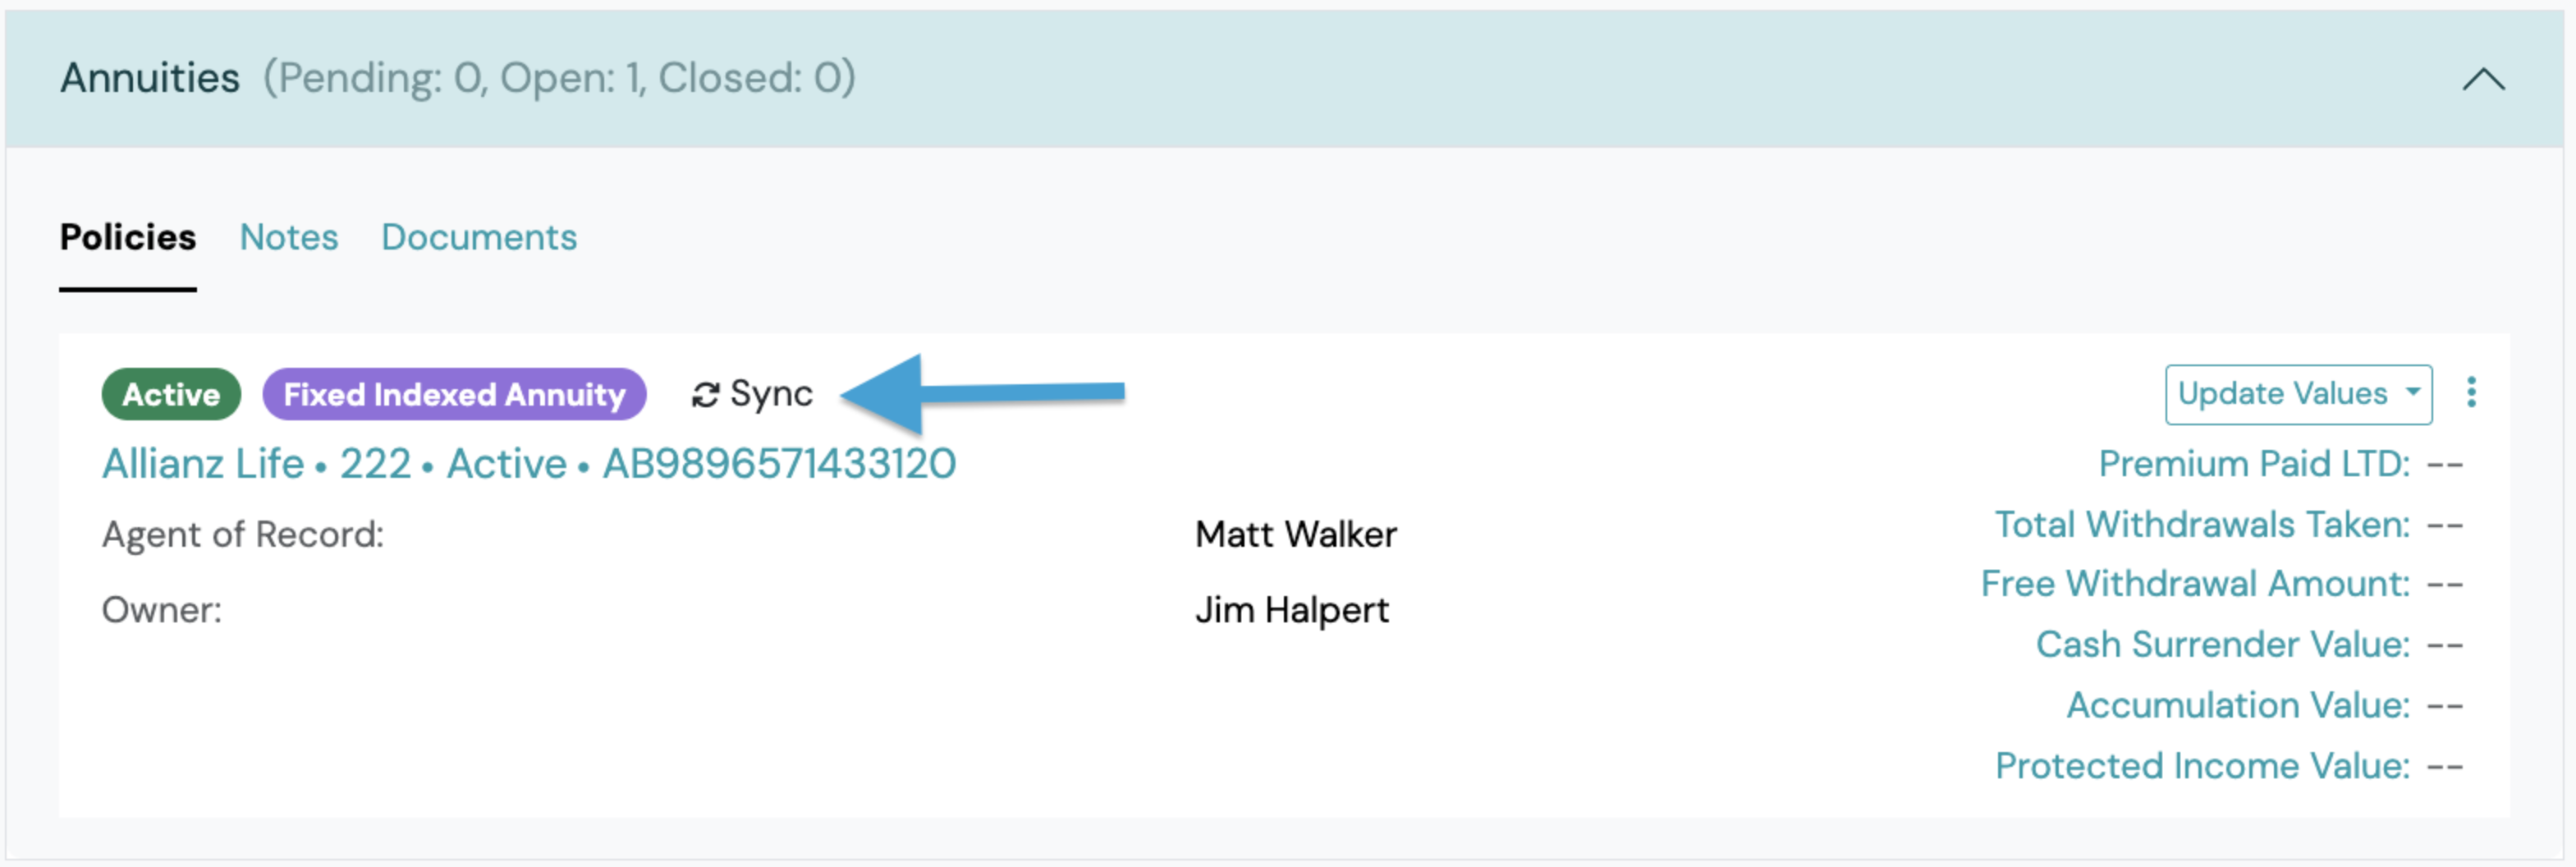
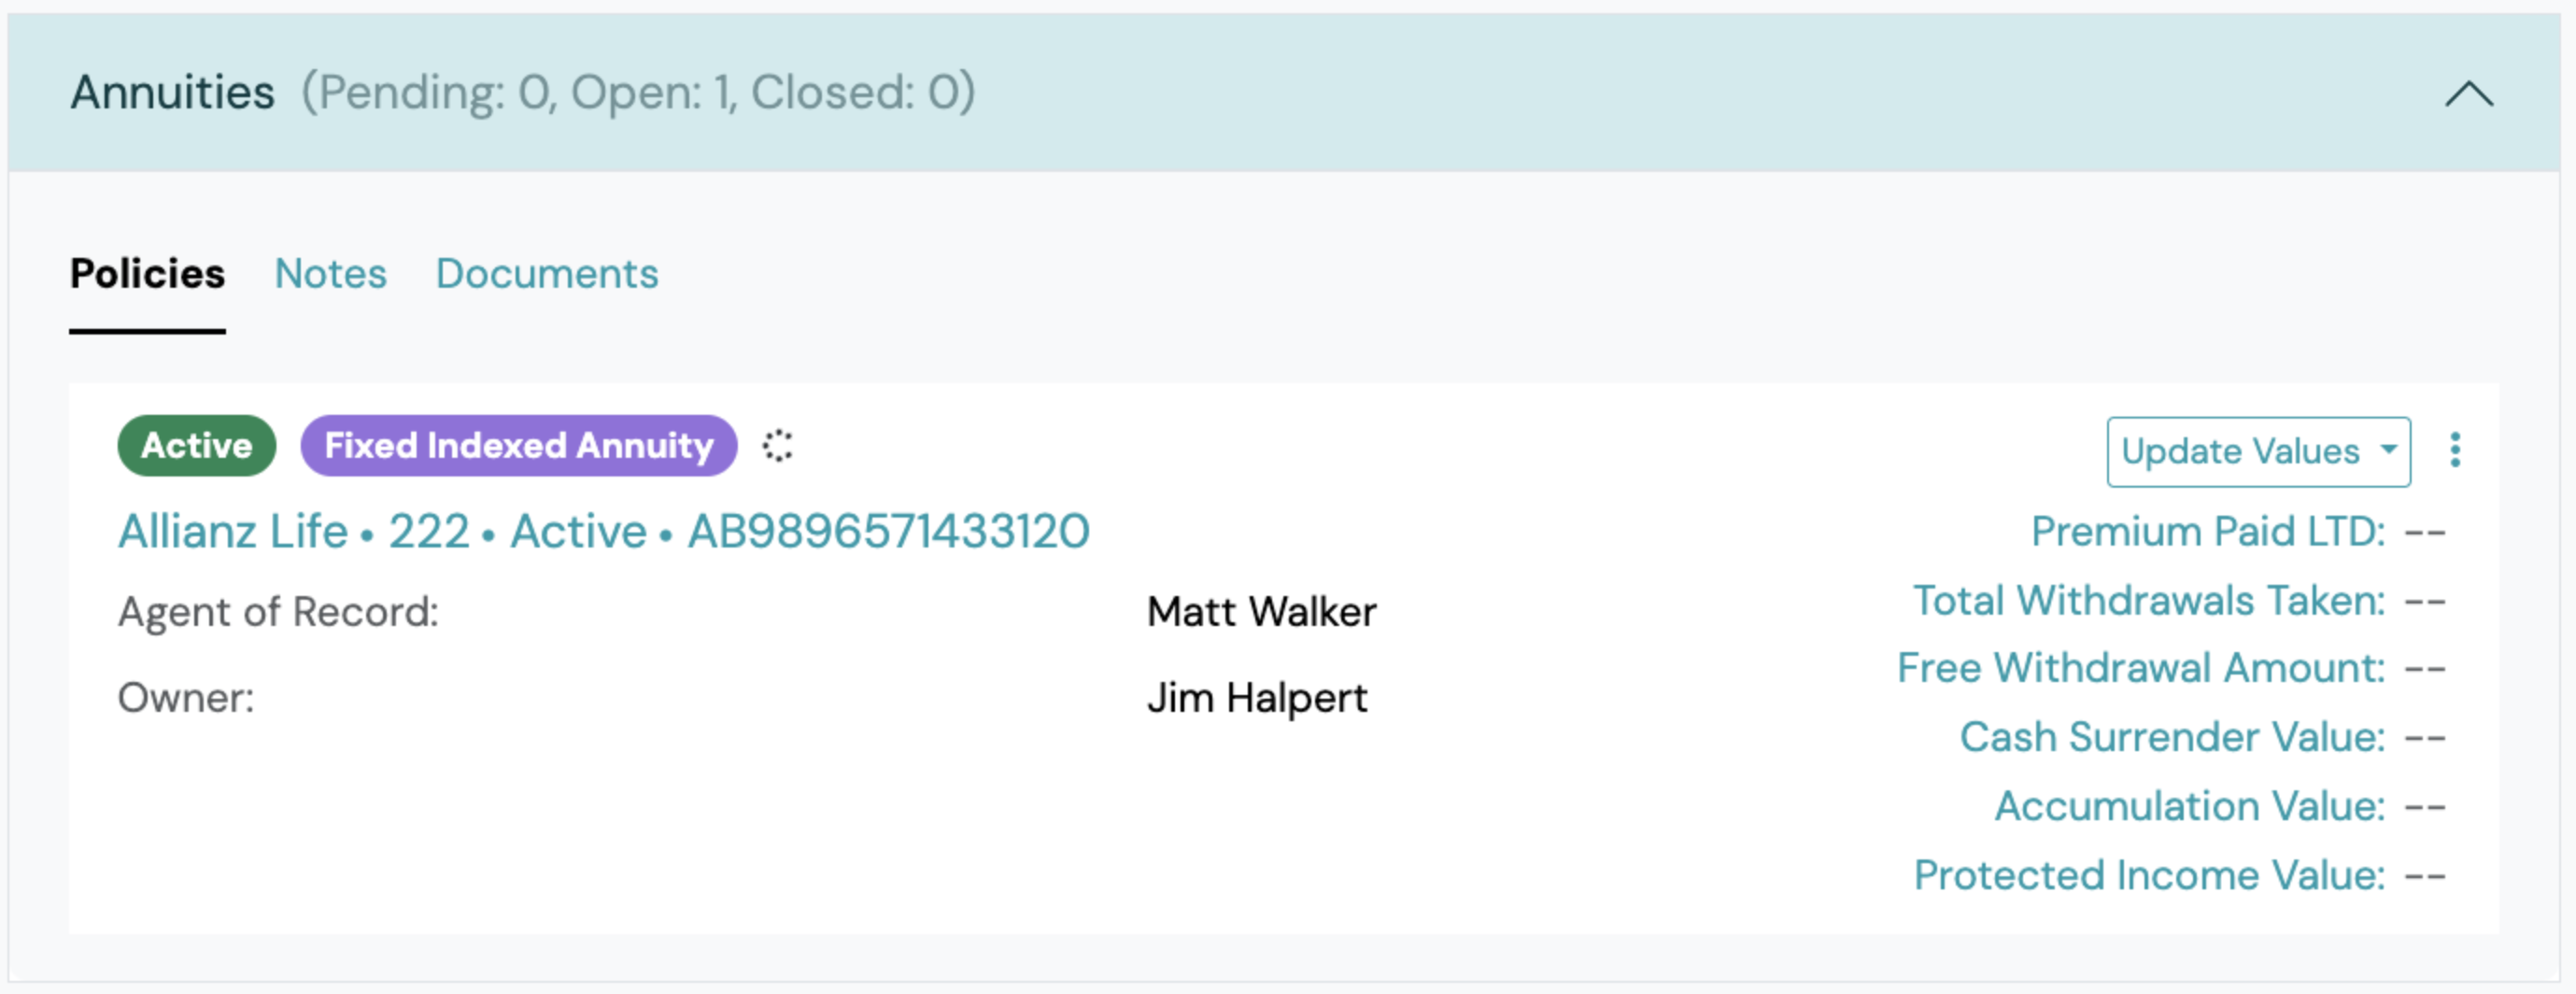
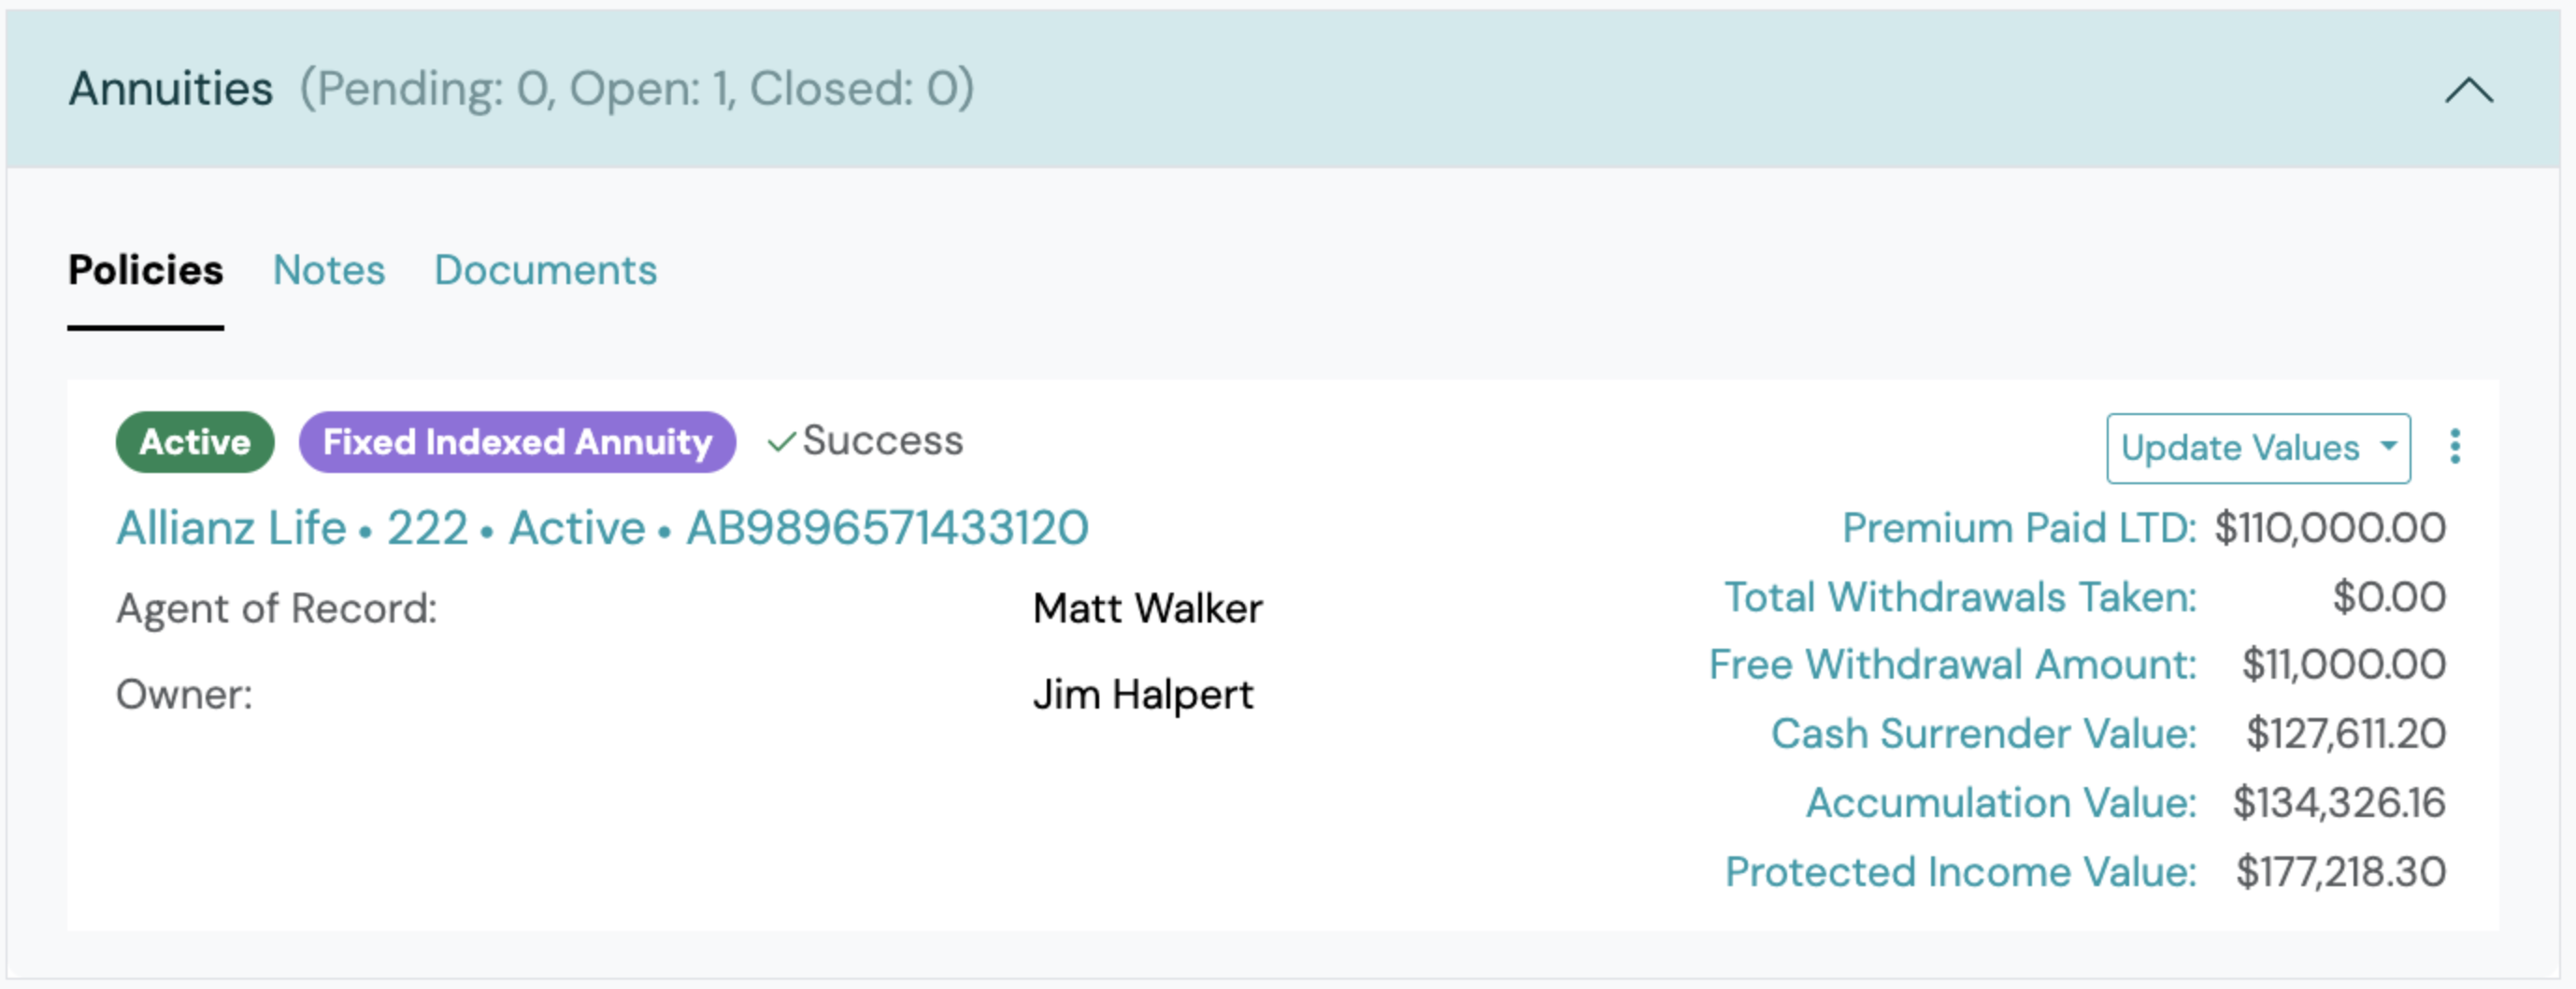
Section titled “Step 4: Force Sync a Policy”Force syncing means prioritizing a specific policy or account to update on demand, rather than waiting for Swivel Sync to reach it as it works through the queue in the background. Use it here to confirm Swivel Sync is working end-to-end and to give yourself a record with fresh values for Step 5.
Step 5: View Synced Values in Swivel Summary
Section titled “Step 5: View Synced Values in Swivel Summary”Steps 1–4 complete your Swivel Sync setup. Step 5 shows you how to surface those values in Swivel Summary, a separate but related configuration.
Now that Swivel Sync is delivering policy and account values automatically, you’ll want to configure how those values roll up on Swivel Summary, the client-ready view that consolidates all of a client’s policies and accounts in one place.
Confirm Sync Values are Mapping Correctly
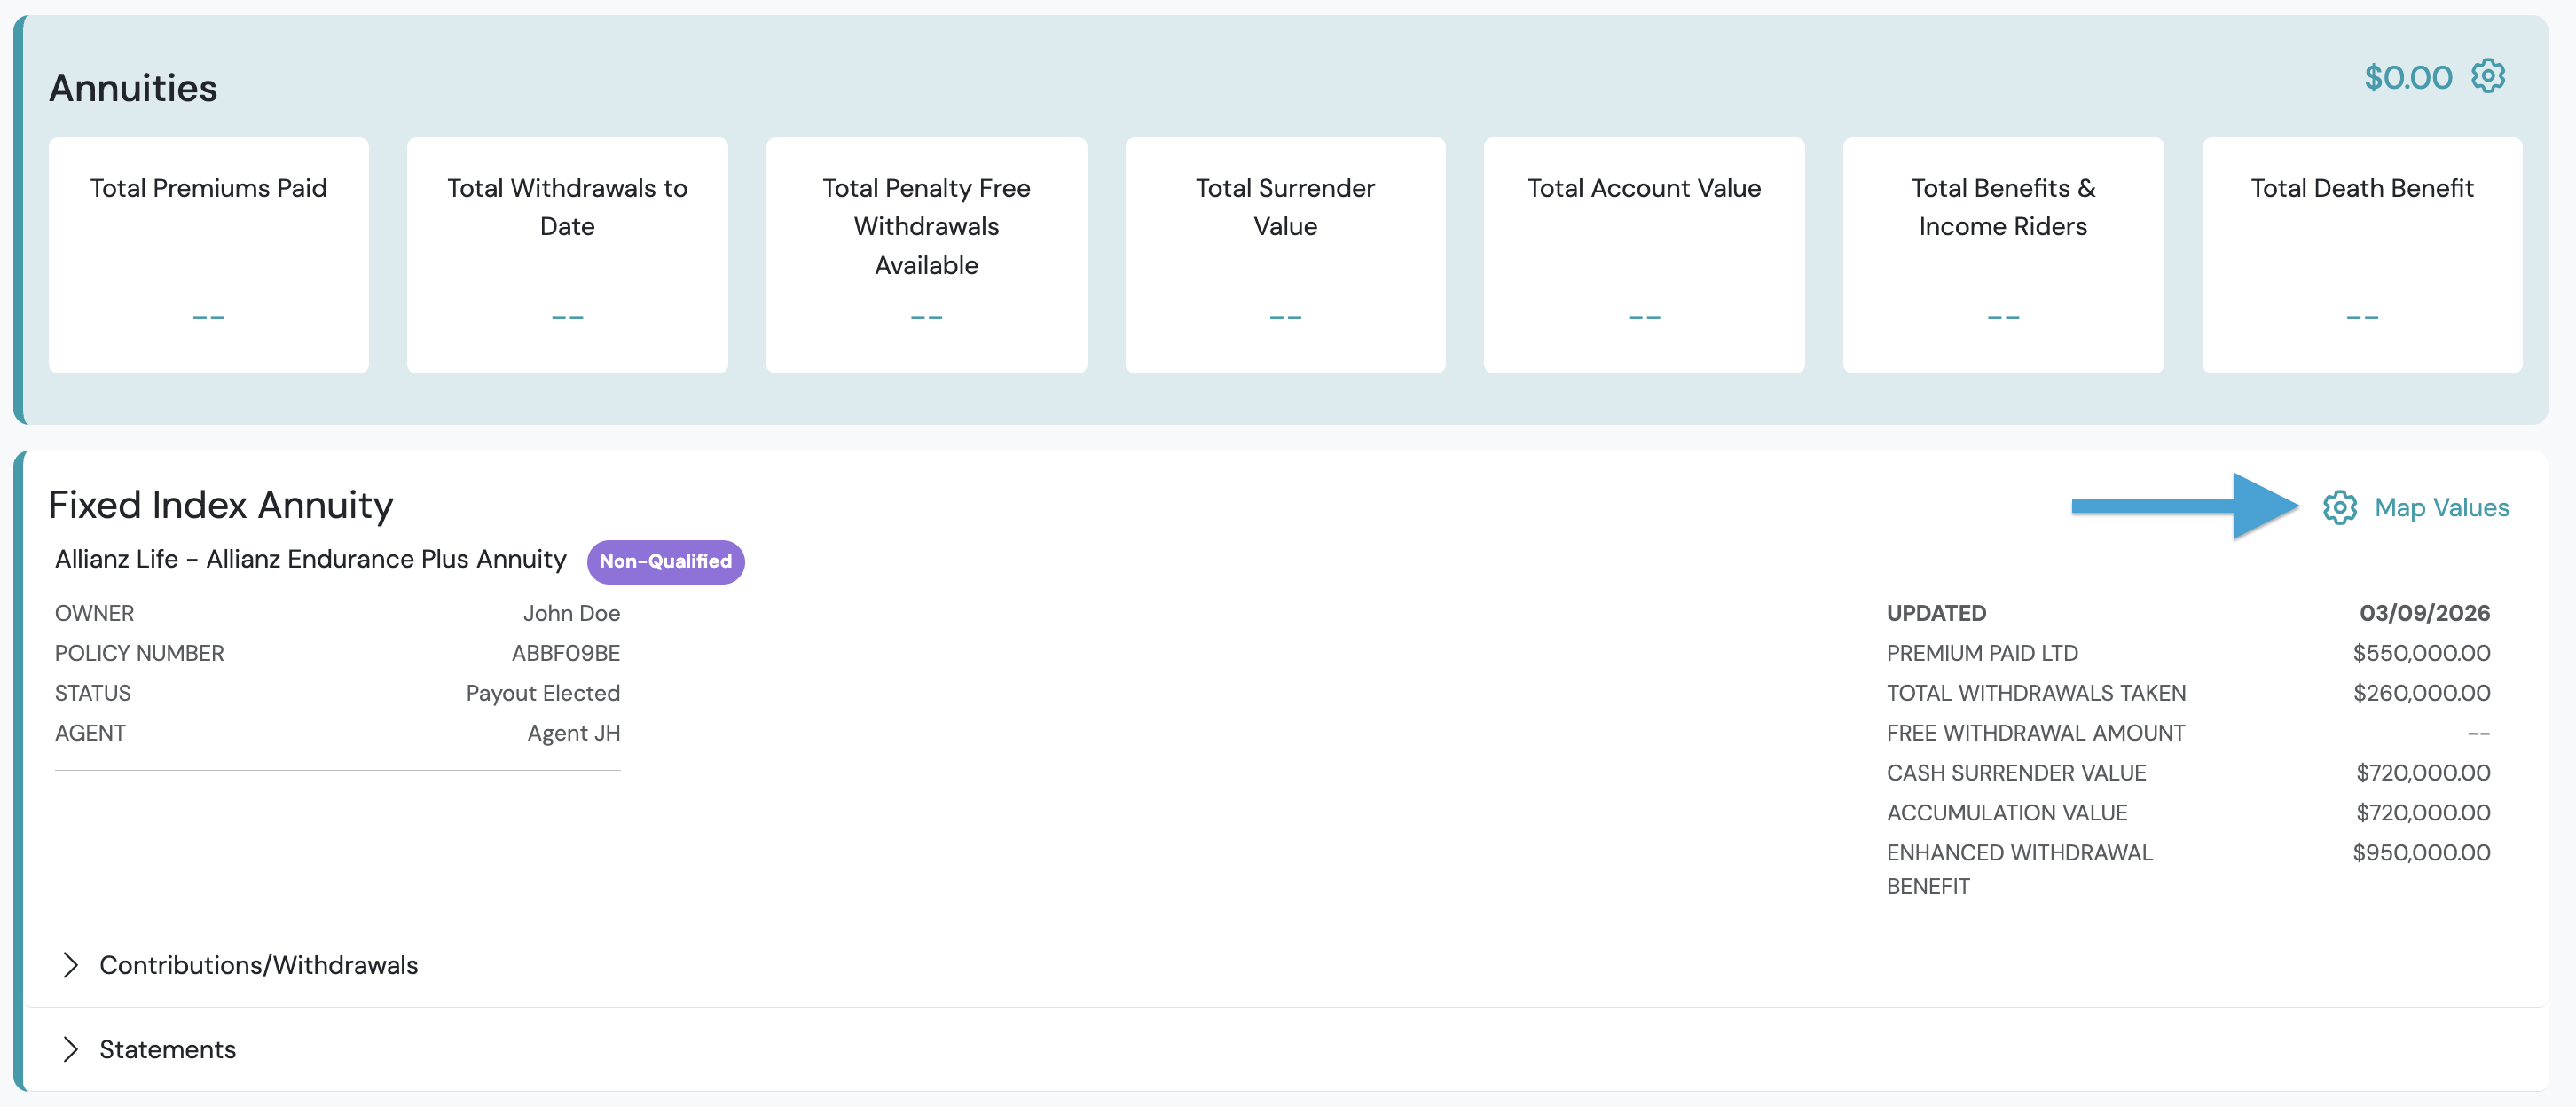
Section titled “Confirm Sync Values are Mapping Correctly”This section walks through mapping Product Line Totals, the most common starting point. The Map Values modal also includes Snapshot Totals and Estate Overview sections, which are covered in Next: Configure your full Swivel Summary.
Use the steps below to map values for one product and verify everything is working end-to-end. You’ll repeat this process for each product your organization offers.
-
Navigate to a client’s record with a Sync-supported policy or account.
-
Click the Swivel Summary button.

-
Find a specific policy or account.
-
Click the Map Values button.
-
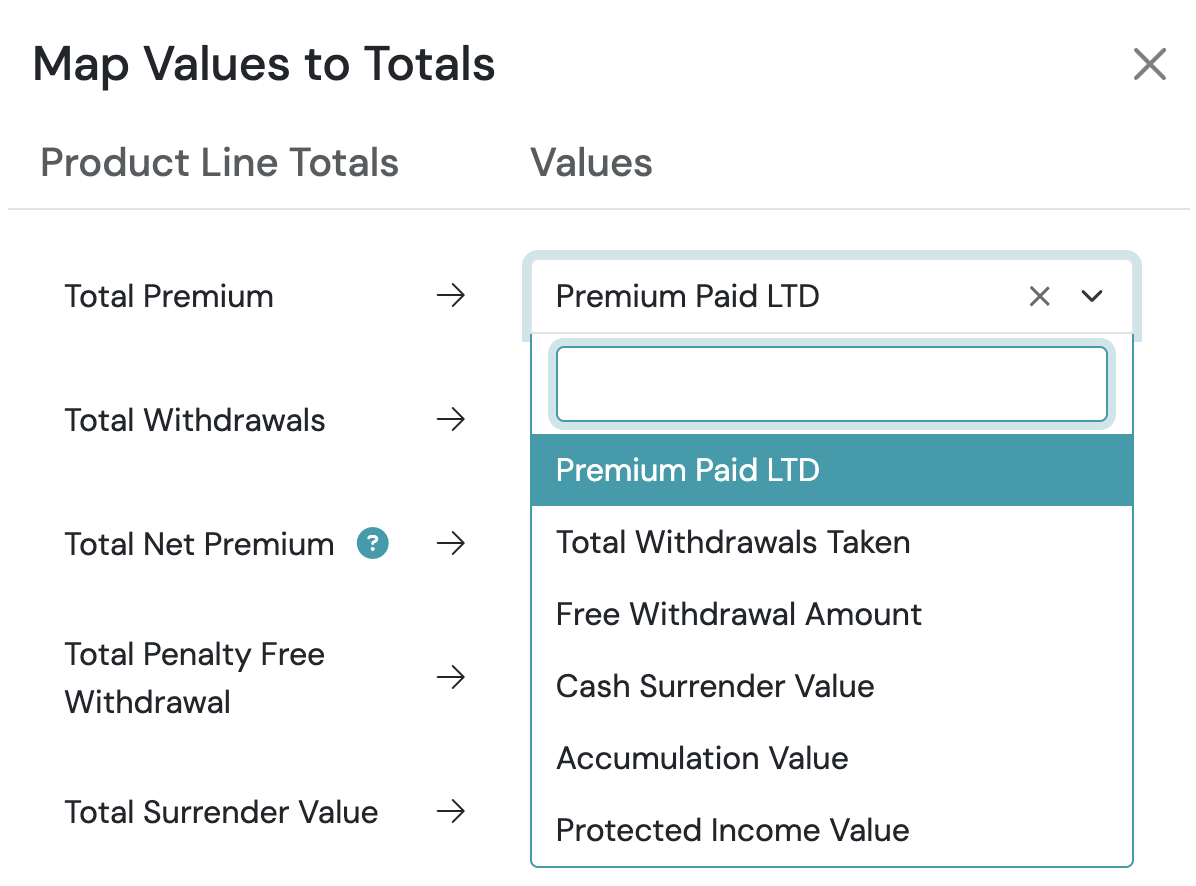
For each total listed on the left-side column, select a value from the dropdown to map. The dropdown shows values already configured for that product, including any values delivered by Swivel Sync.
-
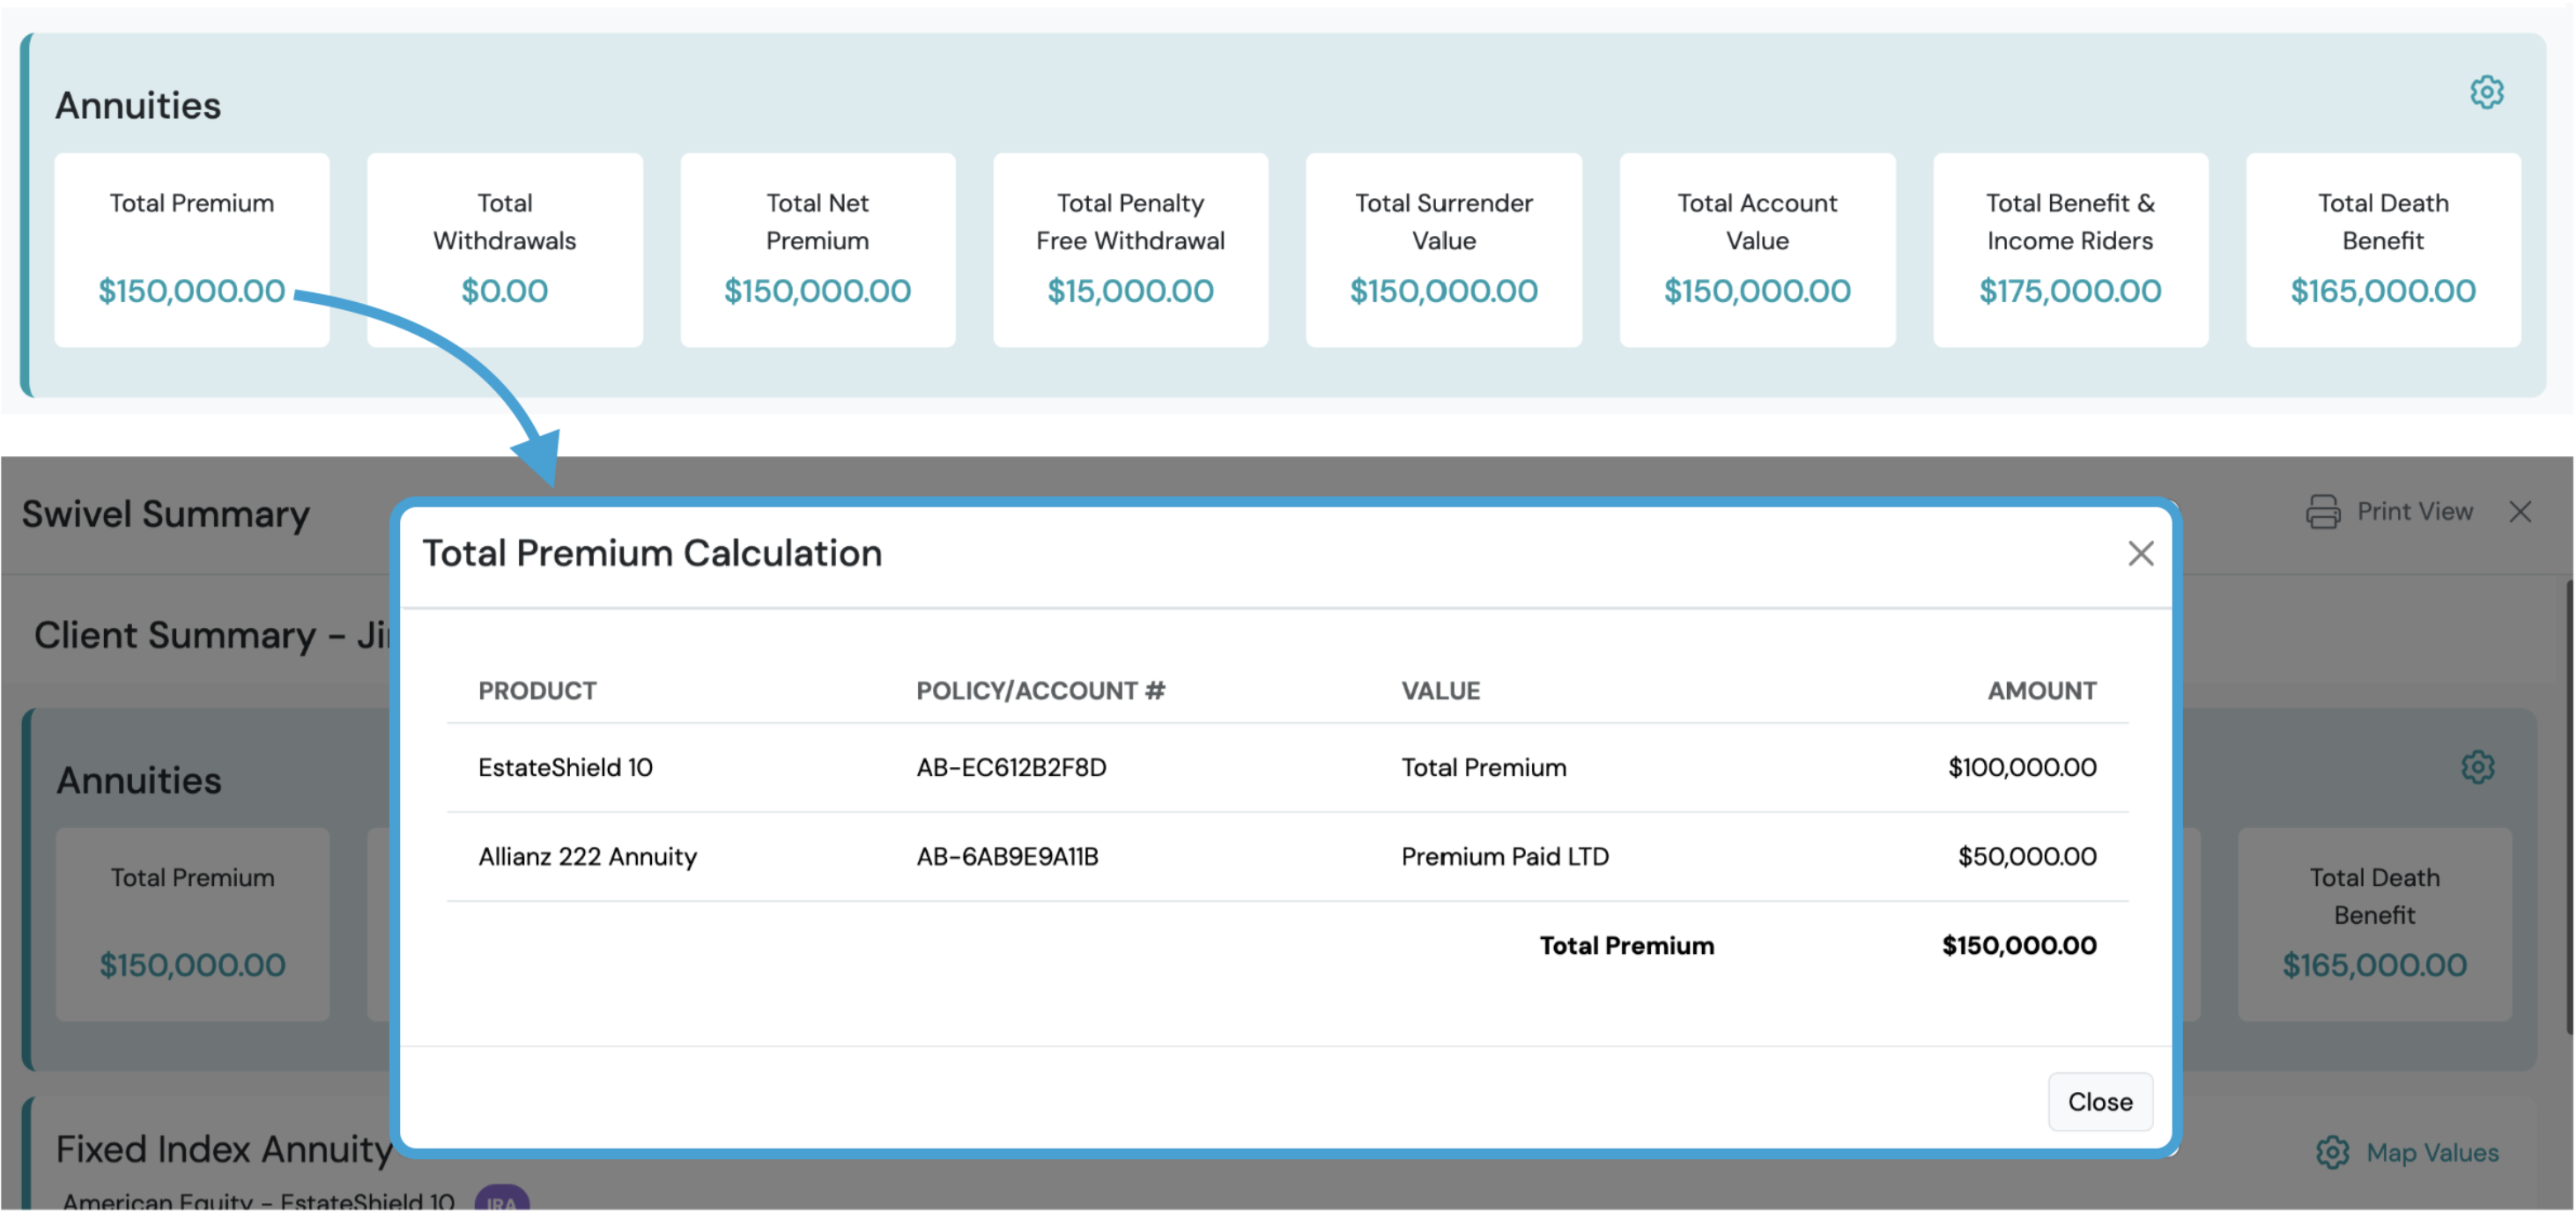
Click any product line total on Swivel Summary to view an itemized calculation breakdown by product, policy/account #, value, and amount. Use this to confirm your mappings are pulling the values you expect.
Next: Configure your full Swivel Summary
Section titled “Next: Configure your full Swivel Summary”The Map Values modal includes additional sections (Snapshot Totals and Estate Overview), each controlling a different part of the Swivel Summary display. For full setup details, see:
- 🔗 Swivel Summary - overview, viewing, print view and branding
- 🔗 Snapshot for Swivel Summary - Snapshot Totals, Overview and Estate Overview
- 🔗 Summary Totals for Swivel Summary - Product Line summary totals, value-based vs. transaction-based mapping
For full step-by-step instructions on configuring your Swivel Summary, reference our entire Swivel Summary collection.