

Start Here: Contacts Basics
How to Edit and Update Contact Information
Learn how to update contact information to keep Swivel accurate and up to date.
When to Use This
Section titled “When to Use This”Use this when you need to:
Section titled “Use this when you need to:”- Update client details (phone, email, address)
- Change contact category or status
- Correct or complete missing information
- Log new information after a meeting or interaction
Start Here
Section titled “Start Here”👉 Open a contact record and click Edit Contact or a field-level Edit icon to begin.
How to Edit a Contact
Section titled “How to Edit a Contact”Option 1: Edit the Full Contact Record
Section titled “Option 1: Edit the Full Contact Record”Use this when updating multiple fields, or making major edits.
- Open the contact
- Select the Edit Contact button
- Update the necessary fields
- Click Save
Option 2: Edit Individual Fields
Section titled “Option 2: Edit Individual Fields”Use this for quick updates to a specific section or field.
- Open the contact
- Locate the field or section you want to update
- Click the
 Edit icon on that card (e.g., Contact Card card, Contact Details card, General Information card).
 - Make your changes
- Click Save
Change a Contact’s Contact Type
Section titled “Change a Contact’s Contact Type”- Select the desired contact.
- From the contact page, navigate to the Action Menu next to the
 button. Select Change Type
 - Select from your created contact types in the drop down field
- Once you’re done, click Save.
Add Notes to a Contact
Section titled “Add Notes to a Contact”After interacting with a client or lead, you should always log notes to keep a complete record. Swivel offers two types of contact notes, each serving a different purpose.
Option 1: Personal Note
Section titled “Option 1: Personal Note”Use for static, at-a-glance information like preferences, personal details, background information (e.g. likes Pepsi, loves to fish, went to KU, etc.).
- Open the contact
- Click + Add Personal Note (above the Contact Card and General Information)
- Enter your note
- Click Save
Option 2: Notes
Section titled “Option 2: Notes”Use for tacking interactions, updates, and activity such as post-meetings, follow-ups, and calls. Each note includes a Timestamp, User who created the note, Rich Text Formatting, and the ability to add Comments.
- Open the contact
- Click Notes tab (located on the right-hand side of the contact page)
- Click +Add Note
- Enter your note
- Click Save
Organize Your Notes
Section titled “Organize Your Notes”Change the Font Size
Section titled “Change the Font Size”- Click the 3-dot action menu on a note
- Select Edit
- Use the formatting toolbar to adjust the font size
- Click Save
Add Comments
Section titled “Add Comments”- Click Comment on a note
- Comments are time-stamped and user-tracked
- Stored within the note (not visible at top level)
Add Tags
Section titled “Add Tags”- Click Edit on a note
- Add a tag in the Tags field
- Save
View Note History
Section titled “View Note History”- Click the three-dot action menu on a note
- Select View history
- Review the previous versions of the note
Pin Important Notes
Section titled “Pin Important Notes”- Click the pushpin icon
- Keeps the note at the top
Use Rich Text Formatting in Notes and Note Comments
Section titled “Use Rich Text Formatting in Notes and Note Comments”Swivel includes a rich text editor for Notes, allowing you to format and organize content more effectively.

What you can do
Section titled “What you can do”Use the formatting toolbar to:
- Apply bold, italic, underline, and strikethrough styling
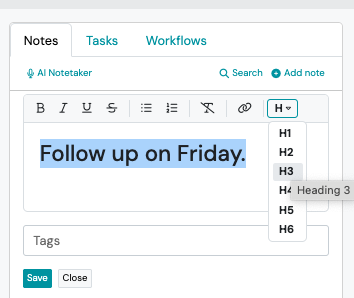
- Add headings (H1–H6) using the dropdown menu
- Create bullet lists, numbered lists, and blockquotes
- Insert and edit hyperlinks
- Clear formatting with a single click
- Paste content from other applications while preserving formatting
How do I add a Photo of my Client?
Section titled “How do I add a Photo of my Client?”Contact Field Definitions
Section titled “Contact Field Definitions”| Field Name | Definition |
|---|---|
| First Name | The legal first name for a contact. |
| Middle Name/Initial | The legal middle name or middle initial for a contact. |
| Last Name | The legal last name for a contact. |
| Nick Name | The common name for a contact (if applicable) |
| Gender | The gender or sex of a contact. |
| Suffix | Options include: Jr., Sr., I, II, III, and IV |
| Phone | The phone number for a contact. This will default to their primary phone. |
| The email address for a contact. This will default to their primary email. | |
| Contact Category | Default options include: Client and Lead |
| Contact Status | Status of the contact. |
| Street | The street address |
| Suite/Apartment/Box | The second line street address (ex. Suite, Apt., etc.) |
| City | The address city |
| State | The address state |
| Zip Code | The address 5-digit postal code or zip code. |
| Preferred Name | The nickname or preferred first name of the contact if it differs from their legal first name. |
| Gender | Optional |
| Date of Birth | DOB for the contact |
| SSN | Social Security Number of the contact |
| Medicare Number | The type of email address (ex. Personal, Work) |
| County | The county of residence |
| Marital Status | The legal marital status for a contact. Available options are Single, Married, Divorced, Separated, Domestic Partnership and Widowed. |
| Marital Status Effective Date | The date an update in marital status takes effect. |
| Deceased? | The deceased status for a contact. Available options are Yes and No. |
| Date of Death | The official date a contact was declared deceased. |
| Client Since | Date contact became a client (Note: this field displays only for contacts assigned to the Client category) |
| Lead Source | Optional |
| Servicing Agent | Person assigned to the contact (i.e. Agent of Record). |
| Tags | To learn more, please visit Tags |
| Office | For agencies with multiple offices. To learn more, please visit Data Setup |
| Zone | To learn more, please visit Data Setup |
| Product Interests | Optional |
| User Visibility | To learn more, please visit Advanced Contact Visibility Options |
| Group Visibility | To learn more, please visit Advanced Contact Visibility Options |
| Do Not Contact | If a contact has requested DNC. When selected, this will suppress their contact information from Swivel generated email and/or text message campaigns. To learn more, please visit Contact FAQs |