Importing Your Data
Import Modal Overview
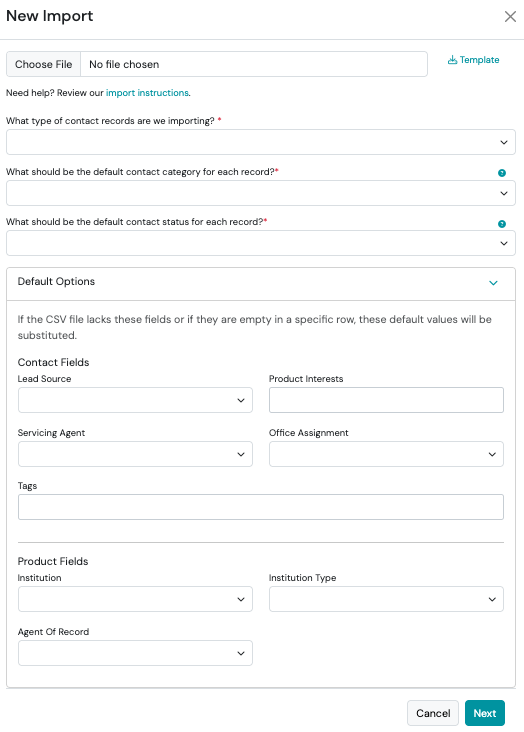
The Import Modal is the first screen you see when starting an import in Swivel.
Think of it as the setup screen for your import. Everything you choose here determines how Swivel interprets your .csv file and applies default settings to your records.
The details below are specific to the Contacts / Client Accounts & Policies import modal. Other import types (e.g., Event Attendance, Transactions, Appointments, Compensation) have slightly different modals. While some options and defaults may differ, the workflow is similar.
Required Fields in the Modal
Section titled “Required Fields in the Modal”Some fields (notated by a red asterisk) must be filled out before you can continue with your import. These ensure Swivel knows how to handle your data:
| Field | Description |
|---|---|
| What type of contact records are we importing? | Default options include Individual or Company. For more information, please visit How do Contacts work in Swivel? |
| What should be the default contact category for each record? | Default options include Lead and Client. For more information, please visit How do Contacts work in Swivel? |
| What should be the default contact status for each record? | Default options include New and Active. For more information, please visit How do Contacts work in Swivel? and Contact Status Examples. |
Default Options
Section titled “Default Options”The modal lets you select default values for optional fields, which will apply to all imported records unless your .csv has its own values:
| Contact Fields | Description |
|---|---|
| Lead Source | Single-option select; if left blank, the default is None To learn more, visit the Lead Source article. |
| Product Interests | Multi-option select (you can select multiple choices); if left blank, the default is None This dropdown is a list of the Product Types configured for your account. To learn more, visit the Product Types article. |
| Servicing Agent | Single-option select; if left blank, the default is Not Assigned Valid options are existing account users with the Agent permission role |
| Office Assignment | Single-option select; if left blank, the default is Not Assigned Valid options are available office(s) to select (if applicable). To learn more, visit the Offices section in the Data Setup article. |
| Tags | Multi-option select (you can select multiple choices); select from existing tags or create new tags by typing into the field To learn more, visit the Tags article. |
| Product Fields | Description | Additional Configuration? (Optional) |
|---|---|---|
| Institution | The Financial Institution/Carrier associated to the products. To learn more, visit the Financial Institutions article or | Yes |
| Institution Type | The Type of Financial Institution. Pre-configured options include: Insurance Carrier, Broker-Dealer, and Custodian. To learn more, visit the Financial Institutions article. | Yes |
| Agent of Record | The Agent of Record for the policy. Also used to capture the Writing Agent. To learn more, visit the User Roles article and the Agents in Swivel section. | Yes |
Mapping Import Fields
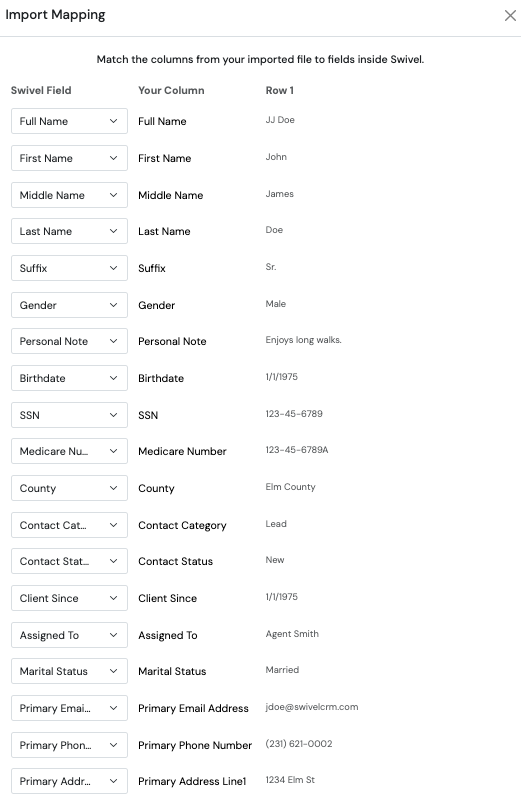
Section titled “Mapping Import Fields”Once you have selected your .csv file and completed the Import Modal, you will be brought to a Field Mapping Modal. Proper mapping ensures your data lands in the right place.
The far-left column shows the Swivel fields where your data will be imported.
The next columns display your file headers and the first two rows from your .csv, so you can confirm that each column of data is mapped to the correct Swivel field.