Calendar
Swivel Calendar Views
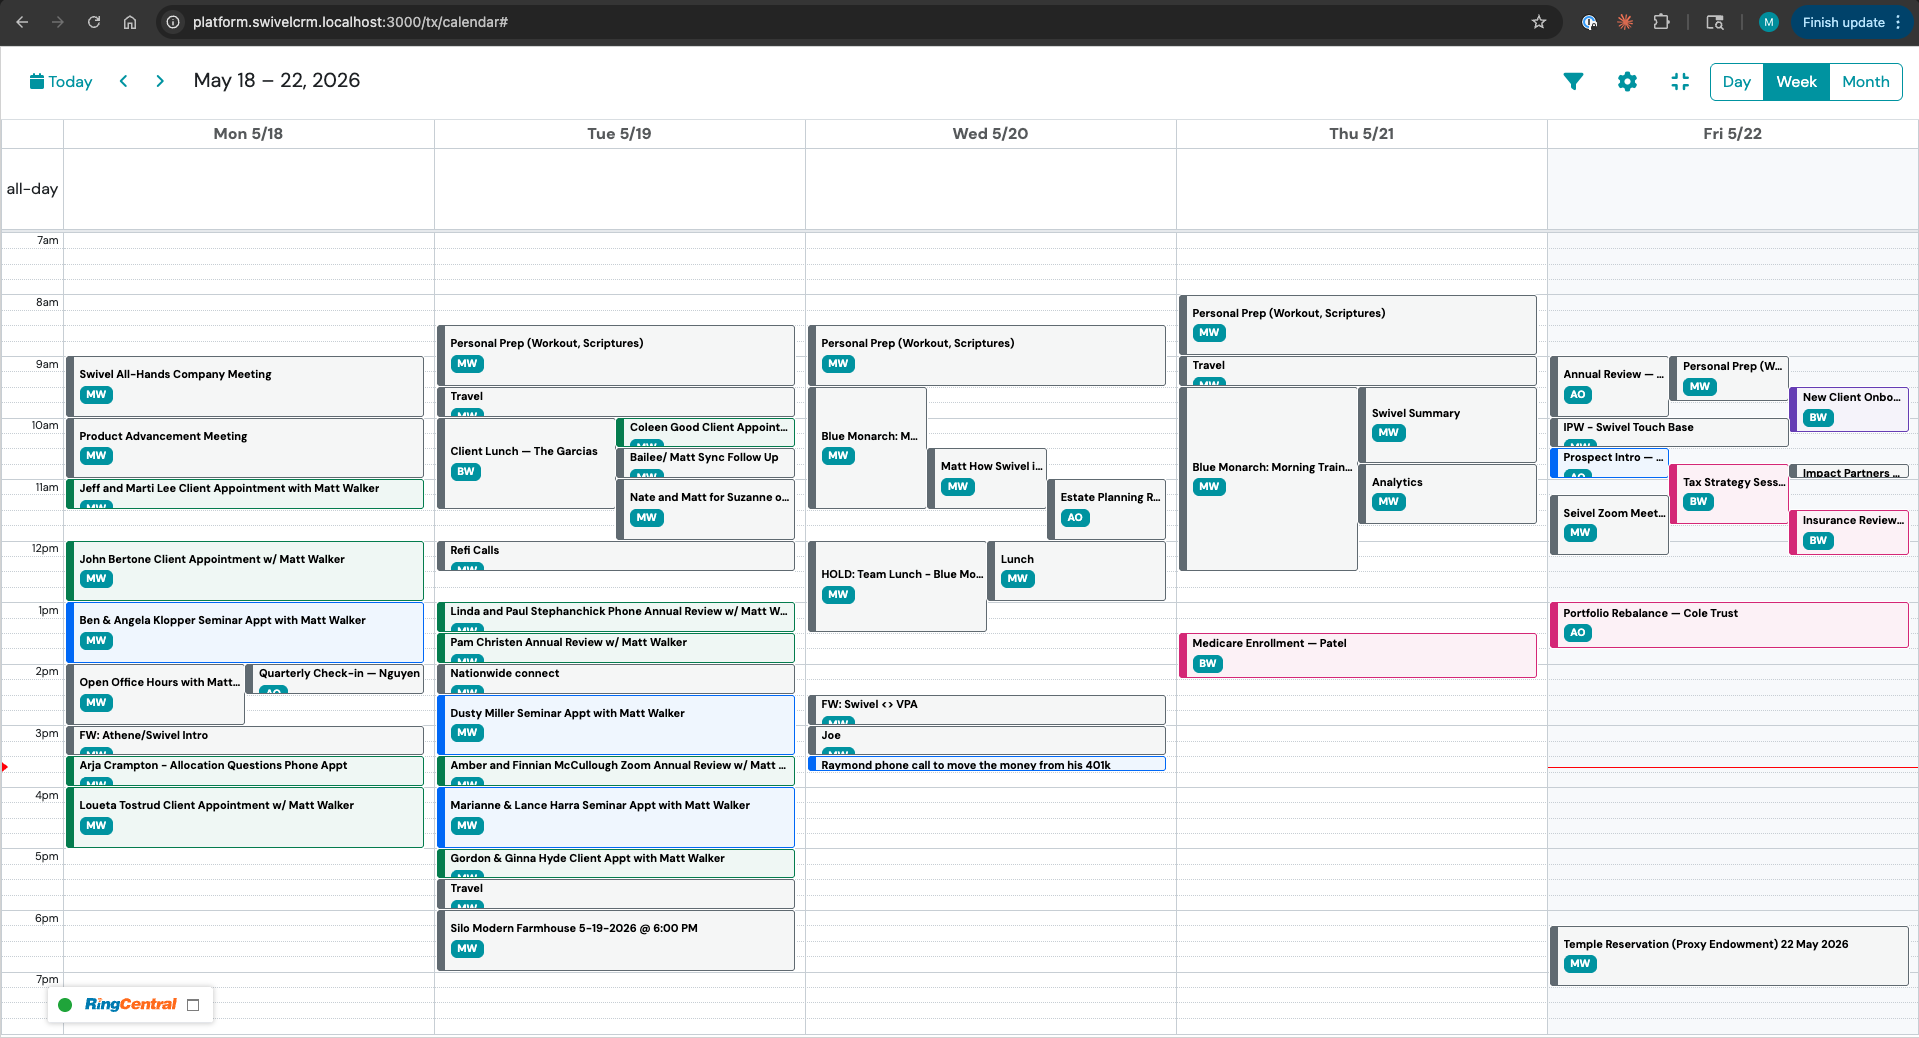
Customize your calendar display settings including density, start day, working hours, visible days, color coding, and side by side view.
Users can access their full calendar from the Calendar tab in the left navigation menu.
The calendar provides multiple views to help you manage and review appointments at different levels of detail.
You can drag and drop appointments in any view to change the date or time.
Calendar Display Settings
Section titled “Calendar Display Settings”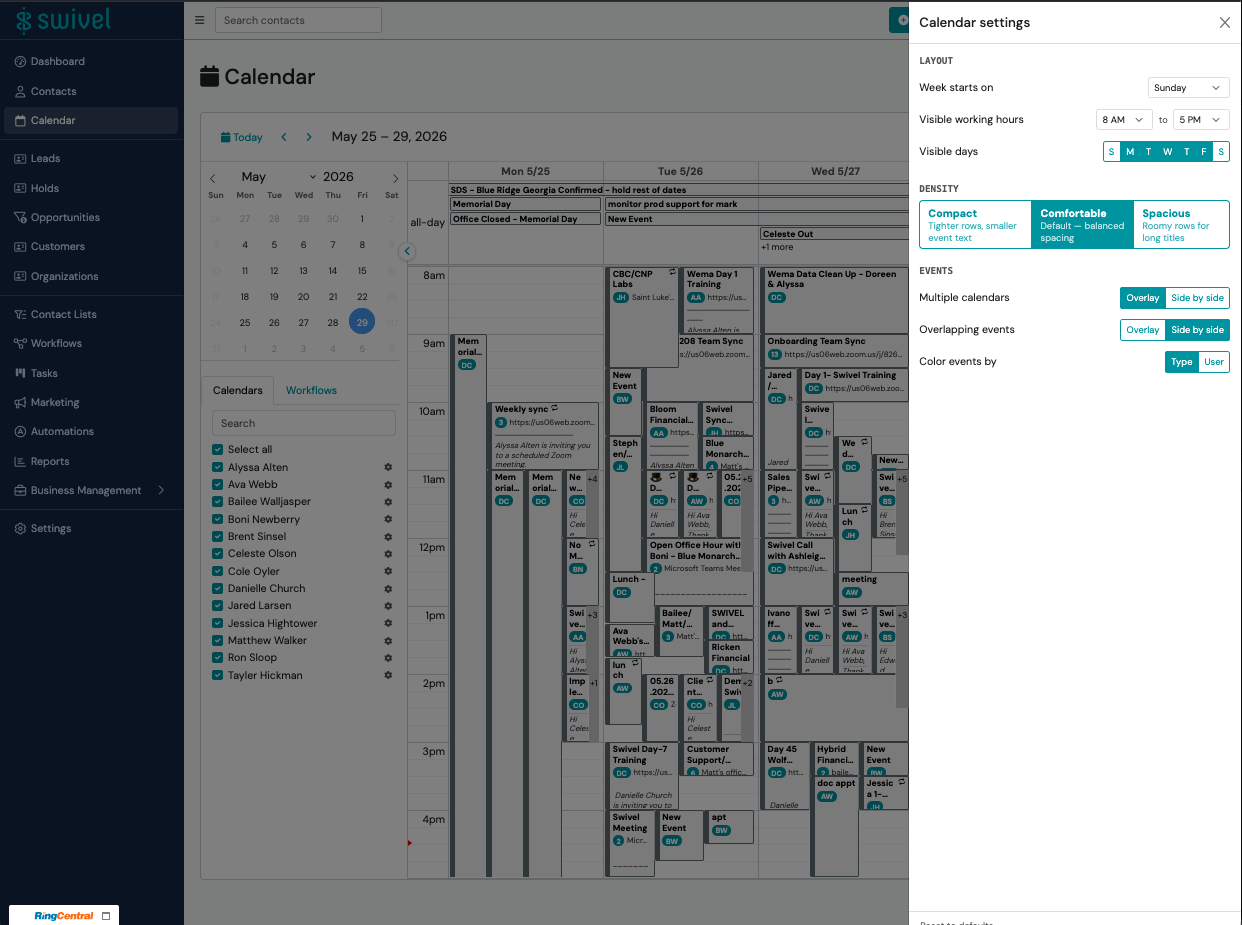
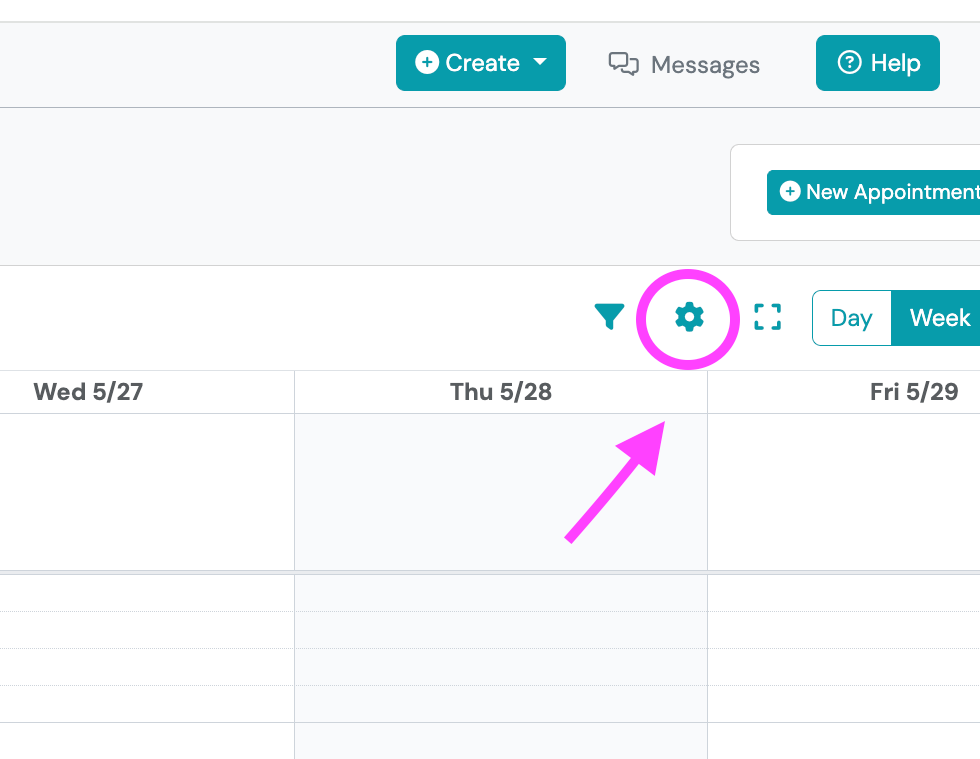
Customize how your calendar looks by adjusting the Settings gear icon on the Calendar page. The settings drawer opens on the right side of the screen and saves your preferences automatically.
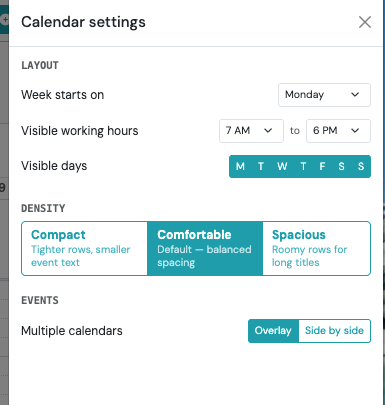
You can customize :
- Start of the week: Choose which day your calendar begins on
- Visible Working Hours: Set the hours you typically work (for example, 9 AM–5 PM) to focus your calendar on the times you use most often
- Visible Days: Choose which days of the week appear on your calendar. For example, you can hide weekends or only display specific workdays
- Calendar density: Control how much information appears on the screen
- Reset Settings: Use Reset to Defaults to restore original calendar settings at any time
Calendar settings are saved per user, meaning changes only affect your own calendar experience.
To access Calendar settings:
- Navigate to the Calendar tab
- Select the Settings (gear) icon
- Update your preferences
Changes apply immediately.
Set Your Calendar Timezone
Section titled “Set Your Calendar Timezone”You can choose the time zone your calendar uses to display and save event times. Your selected time zone appears in the calendar header, such as (EDT), and applies throughout your calendar.
Change Your Calendar Time Zone
Section titled “Change Your Calendar Time Zone”- Go to Calendar.
- Select the Settings (gear) icon.
- Under Calendar timezone, select the time zone you want to use.
When you create or edit an appointment or marketing event, the form shows the time zone you’re working in. The time shown in the form is the time that will be saved for the event.
Available Time Zones
Section titled “Available Time Zones”You can choose from:
- Device default: Uses the time zone set on your computer or phone. This is the default behavior.
- Tenant default: Uses the default time zone set for your organization (tenant).
- A specific US time zone: Choose Eastern, Central, Mountain, Pacific, Alaska, or Hawaii. Arizona and Indiana (East) are also available for areas that do not follow daylight saving time.
Your time zone setting is personal to you. Changing it does not affect anyone else’s calendar.
Choose Your Calendar Start Day
Section titled “Choose Your Calendar Start Day”Select which day your calendar week begins.
Available options:
- Sunday
- Monday
- Tuesday
- Wednesday
- Thursday
- Friday
- Saturday
Your selected start day will also apply to printed calendars.
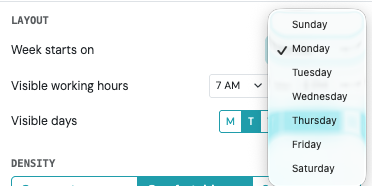
You can also select and unselect days of the week to show only specific days on your calendar when in week view as well as adjust what hours are visible on your calendar view
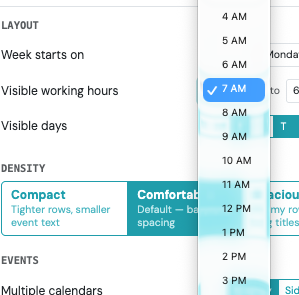
Adjust Calendar Density
Section titled “Adjust Calendar Density”Calendar Density controls how much spacing appears between appointments and how much information is visible on screen. Choose the option that best fits your scheduling style:
Compact
Section titled “Compact”Display more appointments and hours on screen with less spacing.
Best for:
- Busy schedules
- High appointment volume
- Viewing more information at once
In Week View, Compact displays:
- Appointment name
- Owner initials
Location details are hidden to keep crowded schedules easier to scan.
Comfortable
Section titled “Comfortable”Provides balanced spacing and visibility for everyday calendar use.
Best for:
Section titled “Best for:”- Standard calendar management
- A balance between readability and visibility
Spacious
Section titled “Spacious”Adds more spacing around appointments to make schedules easier to read.
Best for:
Section titled “Best for:”- Detailed scheduling
- Lower appointment volume
- Users who prefer additional spacing between appointments
Calendar Views
Section titled “Calendar Views”Swivel offers Day, Week, and Month views so you can review appointments at different levels of detail.
Month View
Section titled “Month View”Density settings adjust:
- Day cell size
- Number of visible appointments before displaying +N More
Day View
Section titled “Day View”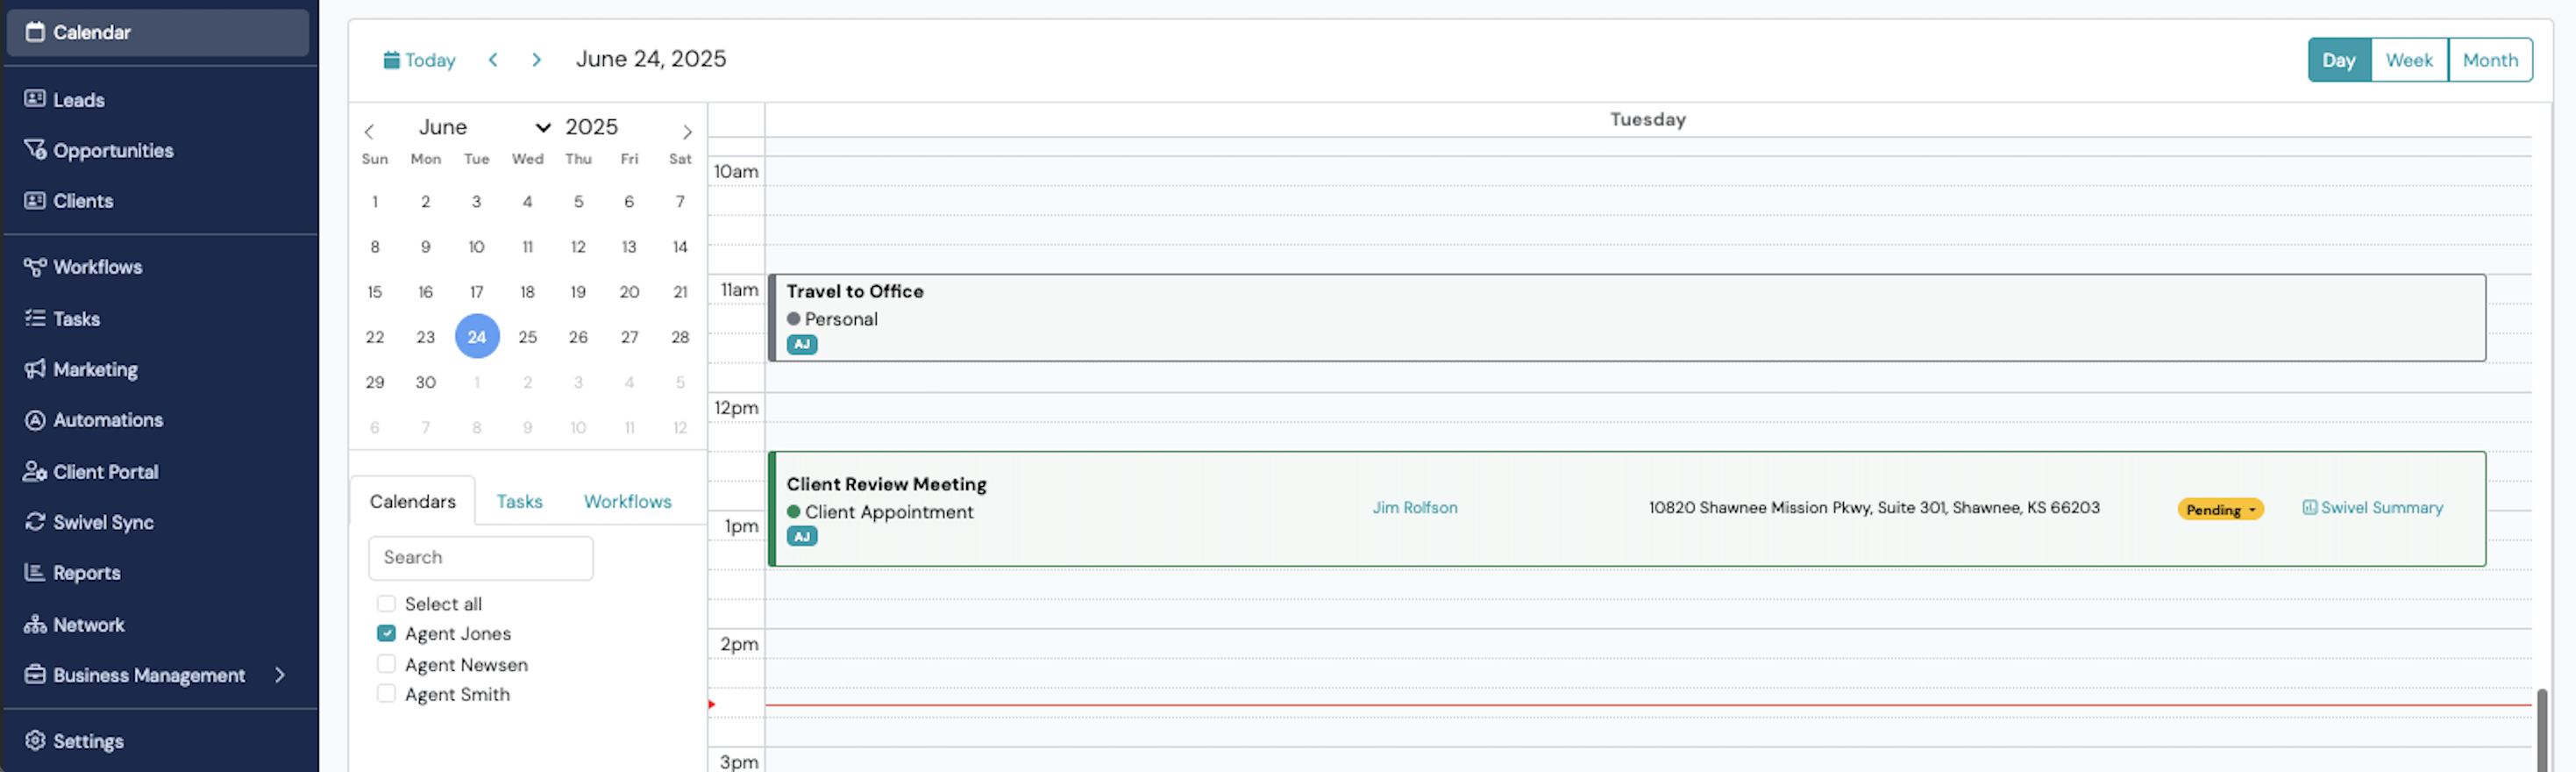
Day View displays the most appointment detail, including:
- Appointment name
- Location
- Associated contact(s) with links to contact records
- Appointment status
- Links to each contact’s Swivel Summary

To update an appointment status:
- Select the appointment status badge
- Choose a new status from the dropdown
Week View
Section titled “Week View”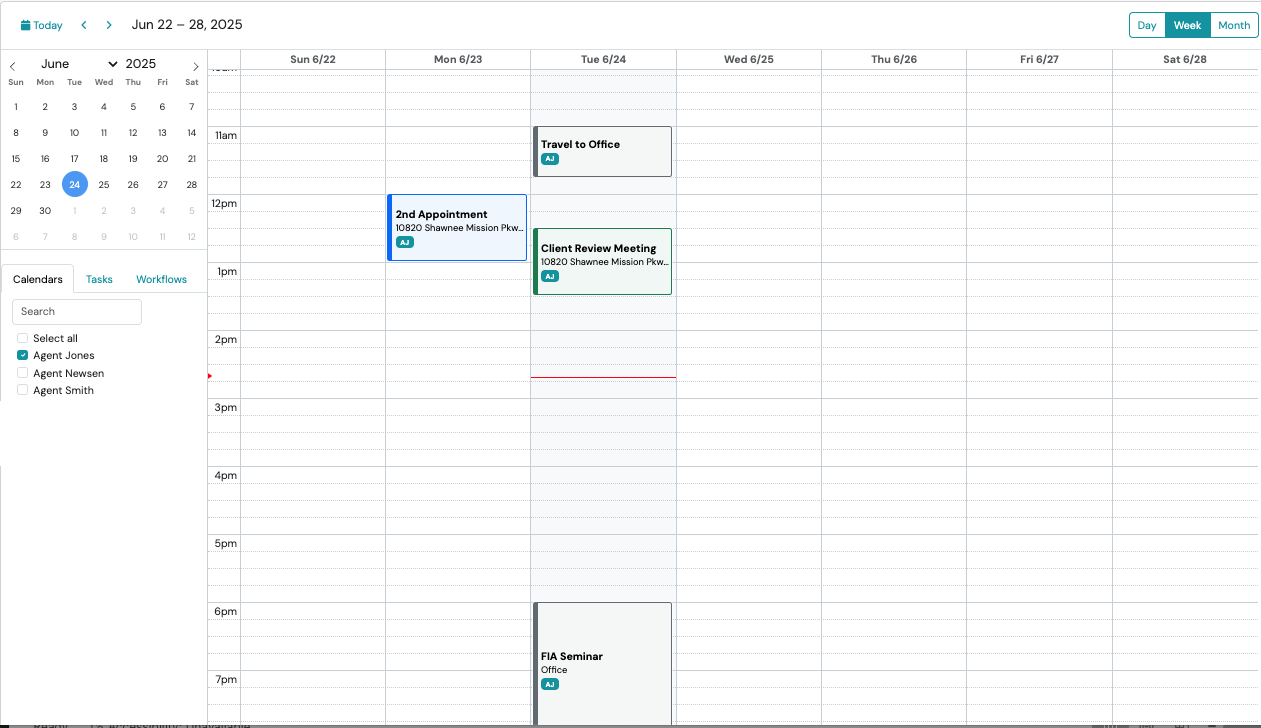
Week View displays appointments across a full week for easier schedule planning.
Selecting an appointment opens additional details, where you can:
- View appointment information
- Access linked contacts and Swivel Summaries
- Edit the appointment
Month View
Section titled “Month View”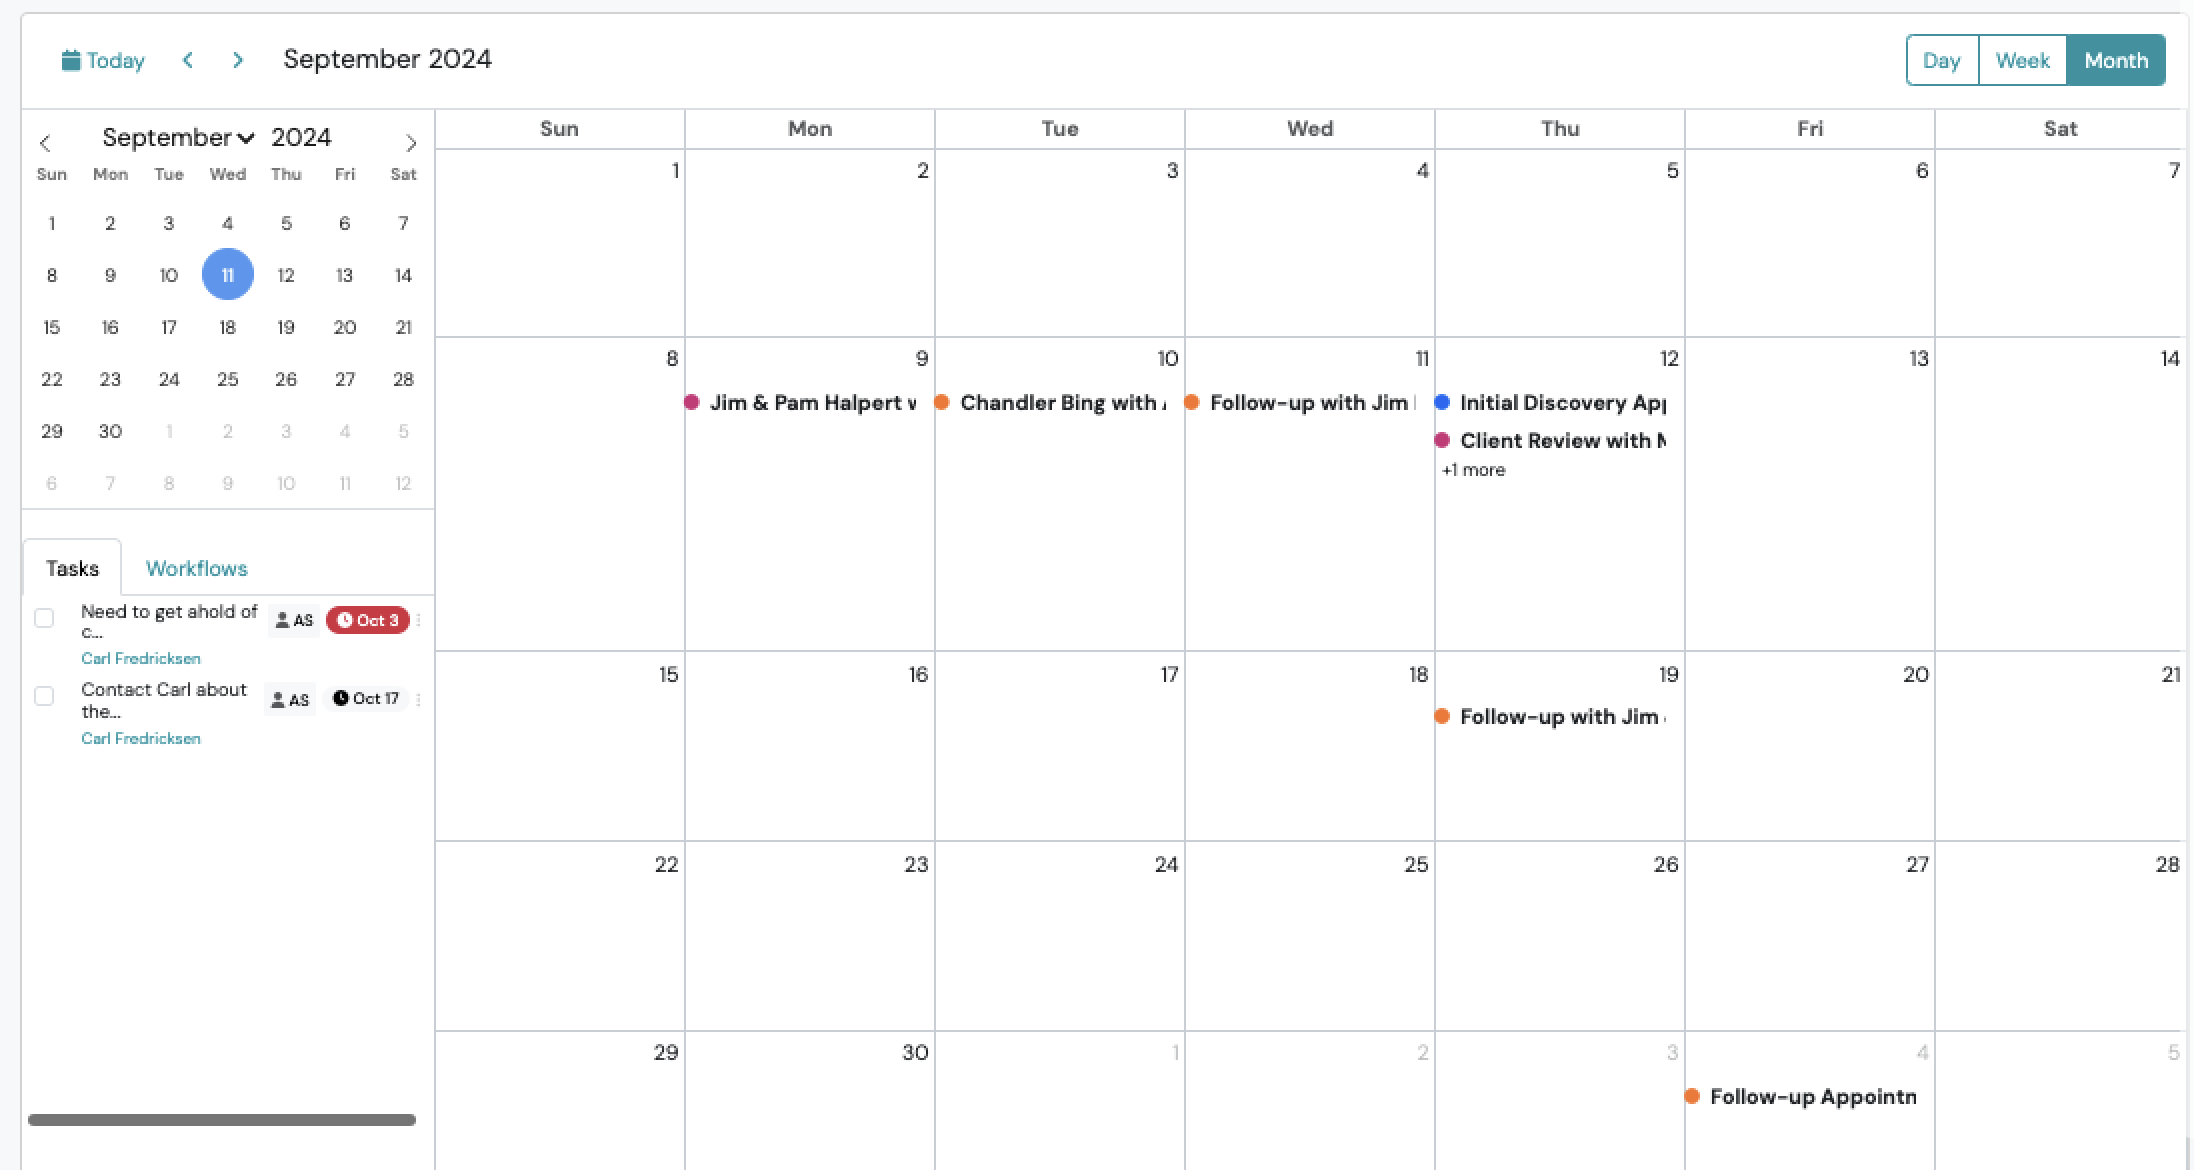
Month View provides a high-level overview of scheduled appointments across the month. Appointments display a condensed appointment name.
Select an appointment to:
- View appointment details
- Access linked contacts and Swivel Summaries
- Edit the appointment
The number of appointments visible within each day may vary depending on the selected Calendar Density setting.
Print Your Calendar
Section titled “Print Your Calendar”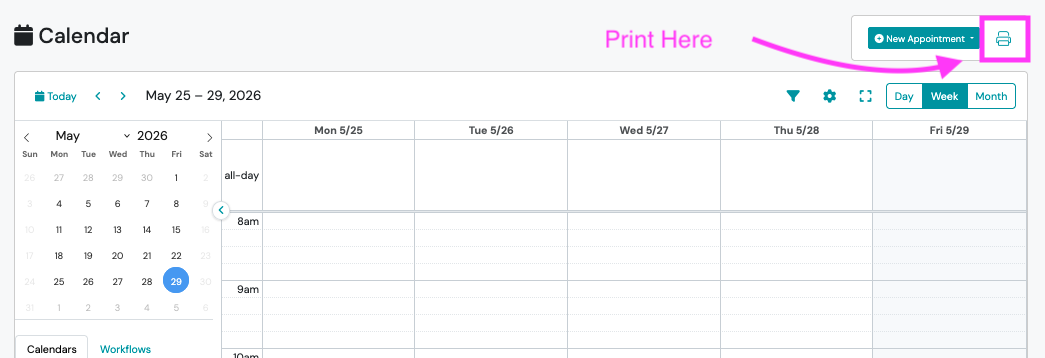
Select the Printer icon to print your calendar from any view.
Printed Day and Week calendars reflect your selected Calendar Density settings.
Printed Month calendars use standard spacing.
Multiple Calendars
Section titled “Multiple Calendars”When you have multiple calendars selected in the sidebar, you can choose how they display. Navigate to Calendar settings > Events > Multiple calendars to select your preferred option.
Overlay: The default setting. All selected calendars display together in a single combined view. This is helpful when you want a compact view of everyone’s schedule in one place.
Side by Side: Each selected user gets their own column with a name header in Day and Week view. Appointments, events, and tasks appear in the correct person’s column, making it easier to compare schedules at a glance.
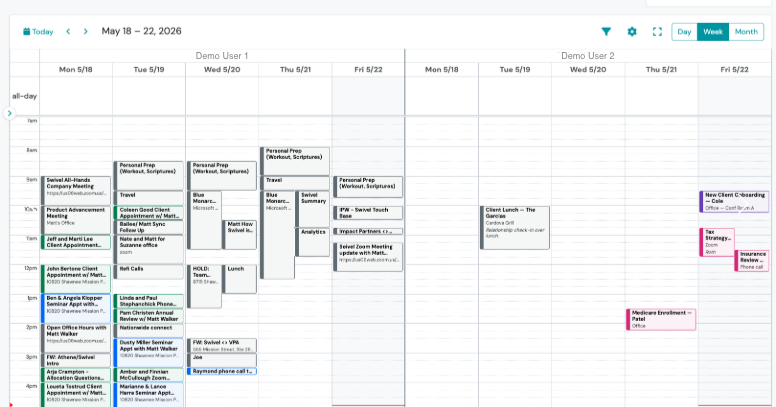
Color Events By
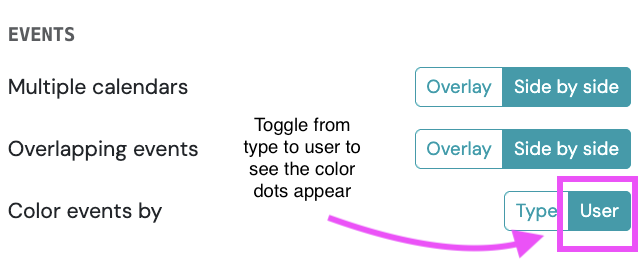
Section titled “Color Events By”You can choose how calendar events are color coded. Navigate to Calendar settings > Events > Color events by to select your preferred option.
Type: The default setting. Events are colored by appointment type, matching your existing appointment type color coding setup.
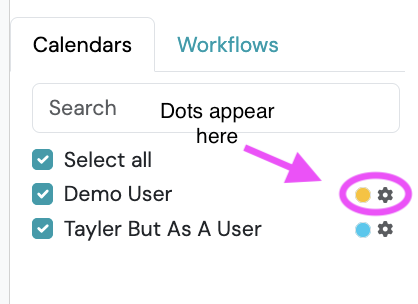
User: Each user in the calendar sidebar is automatically assigned a color from a 10-color palette. This is useful when overlaying multiple advisors’ schedules to quickly tell which appointment belongs to which user.
You can click the color dot next to any user’s name in the sidebar to customize their color. Select Reset to default inside the color picker to revert back to the auto-assigned color.
Collapsible Sidebar and Fullscreen View
Section titled “Collapsible Sidebar and Fullscreen View”Collapsible Sidebar
Section titled “Collapsible Sidebar”Click the round toggle on the edge between the mini calendar panel and the main calendar grid to collapse the sidebar. The calendar expands to fill the space automatically. Your collapsed or expanded preference is remembered across sessions
Fullscreen Mode
Section titled “Fullscreen Mode”Click the expand icon next to the Settings gear to expand the calendar to fill the entire browser window, hiding the app navigation and sidebar. Exit fullscreen by clicking the same button again or pressing Esc on your keyboard. Fullscreen works with both Overlay and Side by side modes