

Network View
Creating and Managing Networks
Create networks that allow you to manage downline agents and groups
Creating and Managing Networks
Section titled “Creating and Managing Networks”Networks allow you to organize and manage groups of linked accounts, agents, and marketing organizations. This guide covers how to create, configure, and manage your Networks.
Prerequisites
Section titled “Prerequisites”Before creating a Network, you’ll need:
- At least one active Network Type configured
- Owner-level permissions in your organization
- The Network feature enabled for your tenant
Accessing Networks
Section titled “Accessing Networks”- Navigate to Settings from the main menu
- Expand the Marketing Organization section in the sidebar
- Click Networks
You’ll see a list of all existing Networks with columns for Name, Type, and Status. Use the search bar to find Networks by name, and toggle “Active Only” to show or hide archived Networks.
Creating a New Network
Section titled “Creating a New Network”-
From the Networks list, click the New Network dropdown button
-
Select the Network Type you want to create from the dropdown menu
-
Fill in the Network details:
- Name - A unique, descriptive name for the Network
- Description - Optional details about this Network’s purpose or scope
-
Add contact information (optional):
- Contact - Primary contact person’s name
- Phone - Contact phone number
- Email - Contact email address
- Address - Street address, suite/apartment, city, state, and zip code
-
Fill in any custom fields defined by the Network Type
-
Click Save to create the Network
Note: If no Network Types are available, you’ll see a message directing you to set up Network Types first.
Viewing Network Details
Section titled “Viewing Network Details”Click on a Network name to view its detail page. The detail page includes:
Network Information Card
Section titled “Network Information Card”- Network name and status badge (Active/Archived)
- Network logo (if uploaded)
- Description
- Contact information (name, phone, email, address)
- Custom field values specific to this Network’s type
- Workflow progress bar (if workflows are attached)
Documents Section
Section titled “Documents Section”If document types are configured, you can attach and manage documents related to this Network.
Notes Widget
Section titled “Notes Widget”Add internal notes and comments about the Network. Notes are visible to other team members with access.
Editing a Network
Section titled “Editing a Network”- Navigate to the Network detail page or find the Network in the list
- Click the three-dot menu
- Select Edit
- Update the desired fields
- Click Save
Changing a Network’s Type
Section titled “Changing a Network’s Type”You can change a Network’s type after creation:
- Click the three-dot menu on the Network
- Select Edit Type
- Choose a new Network Type from the available options
- Click Save
Note: Changing the Network Type may affect which custom fields are displayed. Data in fields that don’t exist in the new type will be preserved but hidden.
Archiving and Unarchiving Networks
Section titled “Archiving and Unarchiving Networks”Archiving a Network
Section titled “Archiving a Network”- Find the Network in the list or detail page
- Click the three-dot menu
- Select Archive
- Confirm the action
Archived Networks:
- Are hidden from active lists by default
- Retain all their linked accounts, agents, and data
- Can be viewed by unchecking “Active Only”
- Can be unarchived at any time
Unarchiving a Network
Section titled “Unarchiving a Network”- Uncheck “Active Only” in the filter to show archived Networks
- Find the archived Network
- Click the three-dot menu
- Select Unarchive
Deleting a Network
Section titled “Deleting a Network”Warning: Deleting a Network is a permanent action that cannot be undone.
- Click the three-dot menu
- Select Delete
- Review the confirmation message
- Confirm the deletion
Consider archiving instead of deleting to preserve historical data and relationships.
Working with Network Documents
Section titled “Working with Network Documents”Networks support document attachments when document types are configured:
- Navigate to the Network detail page
- Scroll to the Documents section
- Click to upload or attach documents
- Select the appropriate document type
- Upload the file or link to existing documents
Adding Notes to Networks
Section titled “Adding Notes to Networks”Use the Notes widget to track important information:
- Navigate to the Network detail page
- In the Notes widget on the right side, click to add a new note
- Enter your note content
- Save the note
Notes are timestamped and show the author, creating an audit trail of communications and decisions.
Understanding Network Workflows
Section titled “Understanding Network Workflows”If the Network’s type has workflow templates configured:
- A workflow progress bar appears at the top of the Network detail page
- The Workflows menu provides access to view and manage active workflows
- Workflows can automate tasks like notifications, approvals, and status updates
Next Steps
Section titled “Next Steps”Once you’ve created your Networks, you’re ready to:
- Use the Network Tab for daily operations
- Link accounts to your Networks
- Track production and marketing metrics
Network-Level Compliance Restrictions
Section titled “Network-Level Compliance Restrictions”The Restrictions page, located under Network → Compliance, allows network administrators to enforce policy controls across connected accounts.
Available Restrictions
Section titled “Available Restrictions”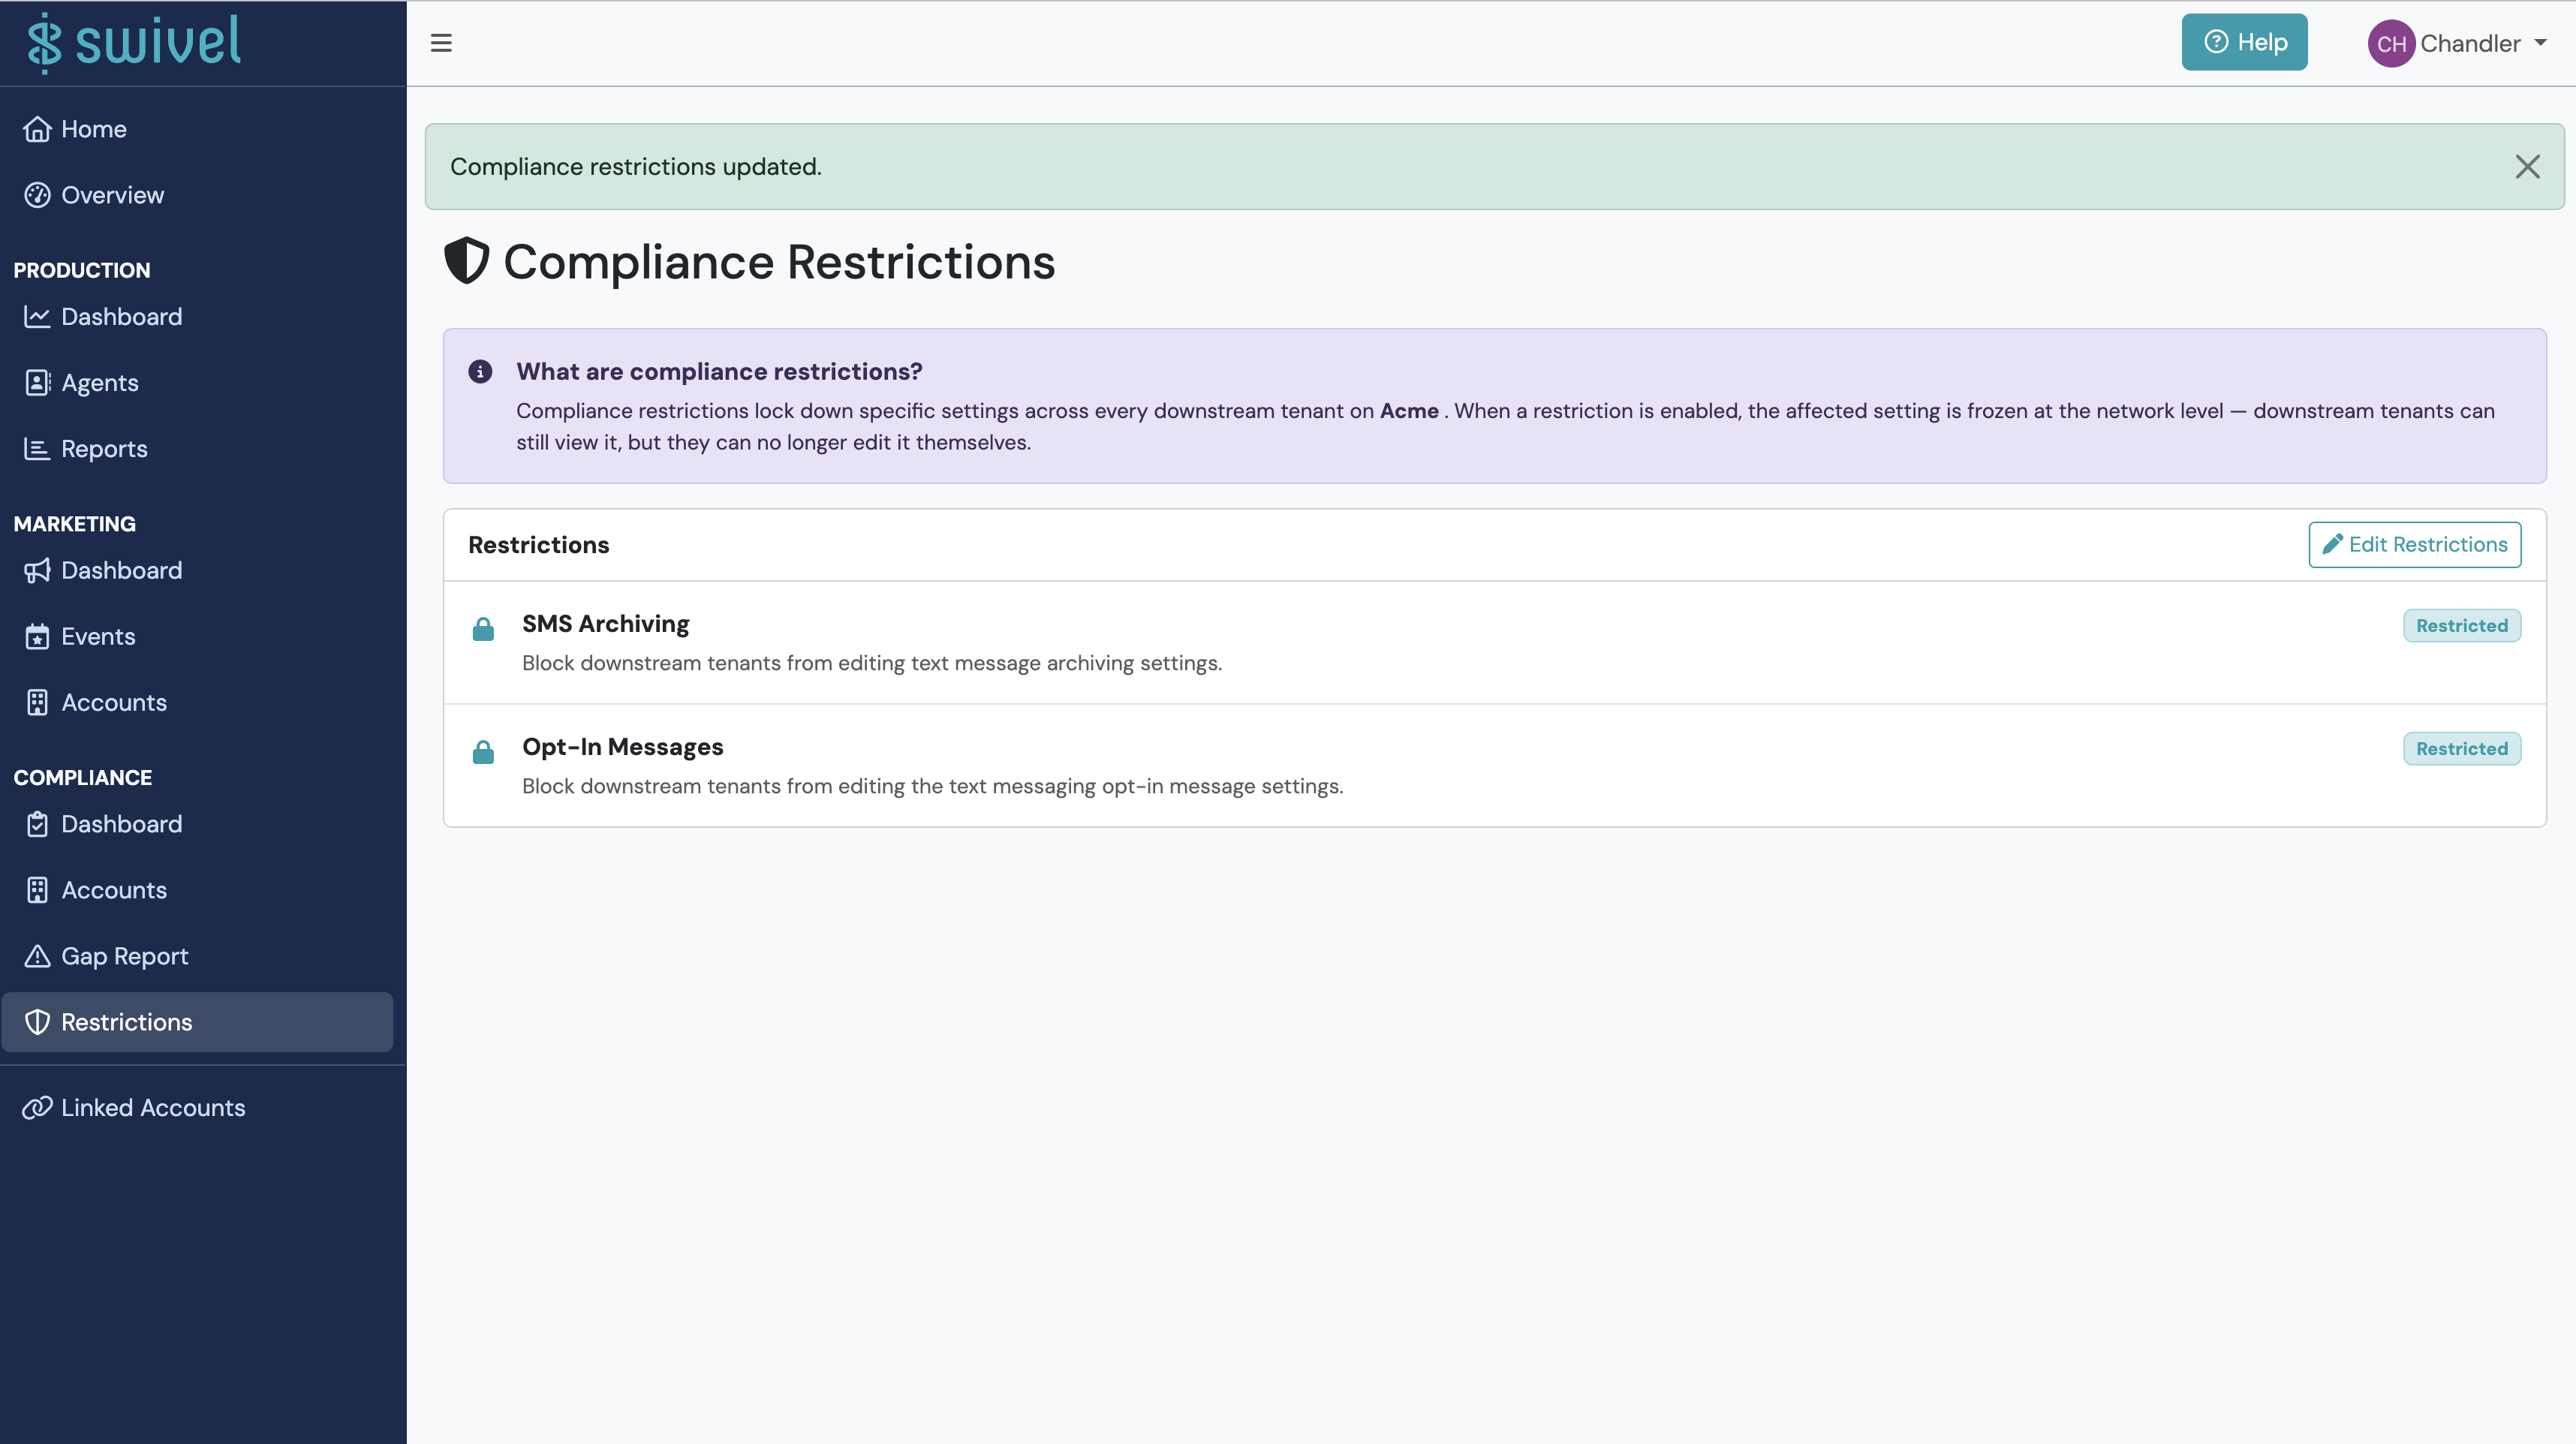
Administrators can currently apply the following controls at the network level:
- Archiving Services
Prevents downstream accounts from adding, editing, pausing, or deleting archiving services. - Opt-In Messages
Prevents downstream accounts from modifying the text messaging opt-in message associated with their accounts - Recordings
Prevents downstream accounts from accessing the Recordings feature
How Restrictions Work
Section titled “How Restrictions Work”- Restrictions are configured at the network level and automatically apply to all linked downstream accounts that have the appropriate compliance role.
- If an account belongs to multiple networks, the system enforces the most restrictive policy across all applicable networks.
Downstream Account Experience
Section titled “Downstream Account Experience”Archiving Services & Opt-In Messages:
Section titled “Archiving Services & Opt-In Messages:”-
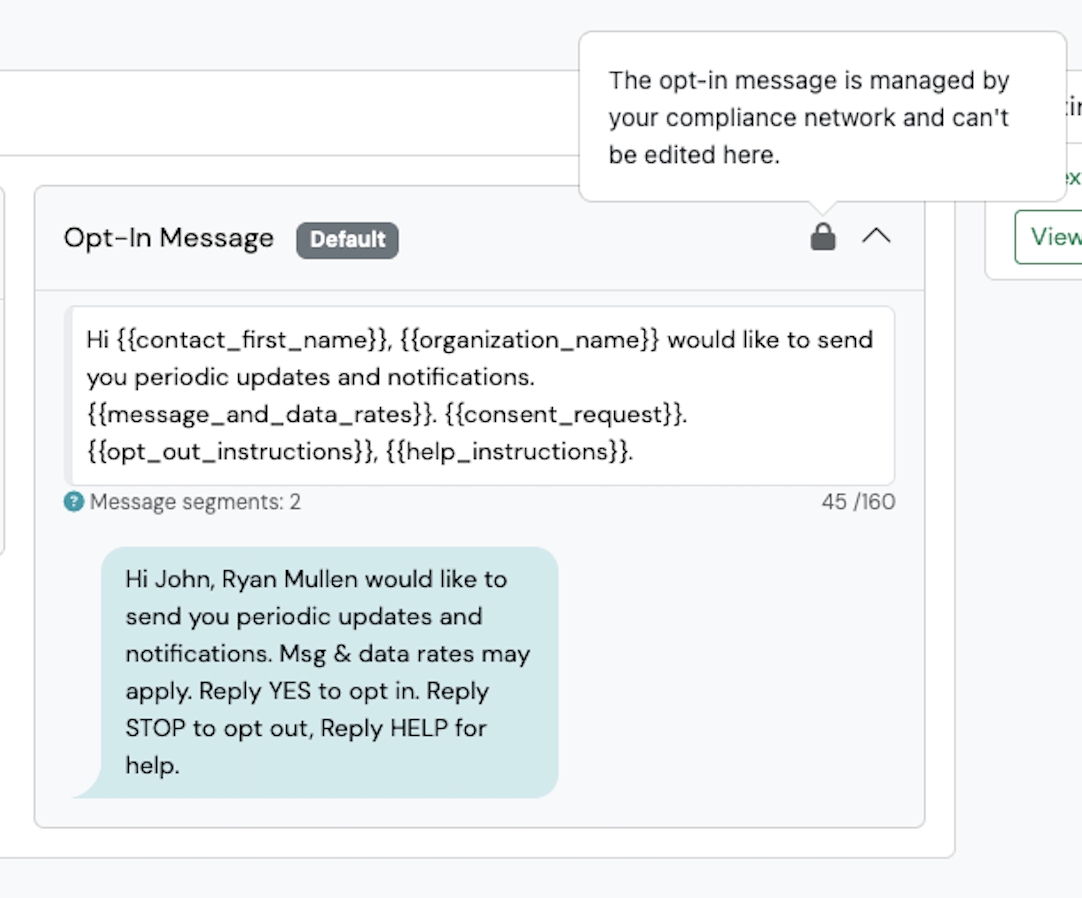
Restricted actions remain visible but are disabled (read-only).
-
A lock icon appears alongside restricted options, with a tooltip explaining the limitation (e.g., “SMS archiving is managed by your compliance network and can’t be edited here.”)
-
Buttons, drop downs, and edit fields are still displayed, but cannot be modified.
-
No existing data is changed or removed: restrictions only prevent further edits.
Recordings
Section titled “Recordings”- The feature is hidden from affected accounts