

Creating and Managing Opportunities
Creating Opportunities
Learn the different ways to create and track opportunities in Swivel, including from the top navigation, contact records, Contact Preview , leads, events, appointments, and the Opportunities view.
Let’s explore a few ways to add and track opportunities in Swivel:
- Create an Opportunity directly on the Contact’s page
- Create an Opportunity directly from the Contact Preview
- Segment Leads by creating an Opportunity from the Leads tab
- Creating an Opportunity directly from the Opportunity View
- Add an Opportunity to a Contact from an Event
- Add an Opportunity to a Contact from an Appointment
Adding Opportunities from the +Create Button on the Top Navigation
Section titled “Adding Opportunities from the +Create Button on the Top Navigation”-
Select +Create while anywhere in Swivel
-
Select the Opportunities accordion
-
Select your Opportunity Pipeline
-
Complete New Opportunity form
- Contacts
- Opportunity Name if left blank, the opportunity name will be an autogenerate series of numbers beginning with OPP- (ex. OPP-B16A8DEE83)
- Description optional
- Agent
- Stage
- Staged On
- Amount/Premium optional
- Est. Close Date optional
- Lead Source
- Next Step optional
- Tags optional
- Opportunity Note optional
- Origin Event optional
- Origin Appointment optional
-
Click Save button.
Creating Opportunities from the Contact Preview
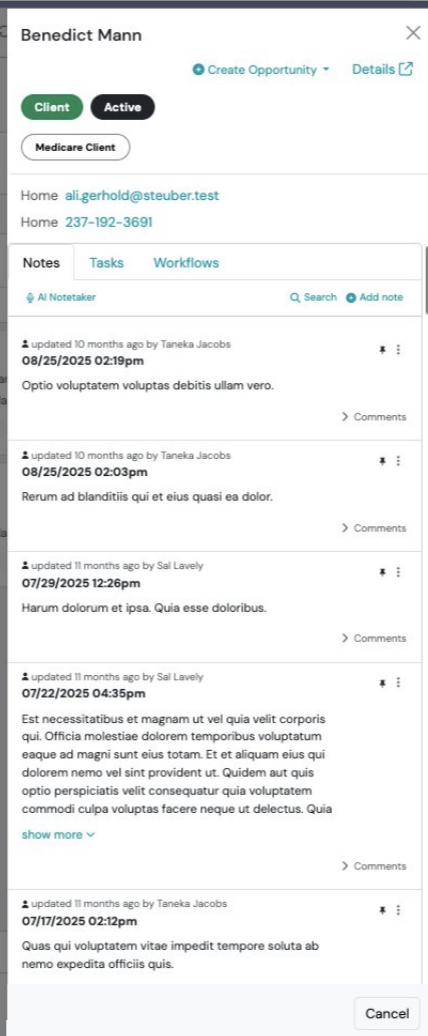
Section titled “Creating Opportunities from the Contact Preview”Users can create a new opportunity directly from the right side slide out of the contact’s preview.
- Open the desired contact’s Preview from anywhere it is available, such as Contacts, Opportunities, Calendar, or Reports. Do this by selecting the Contact name hyperlink.
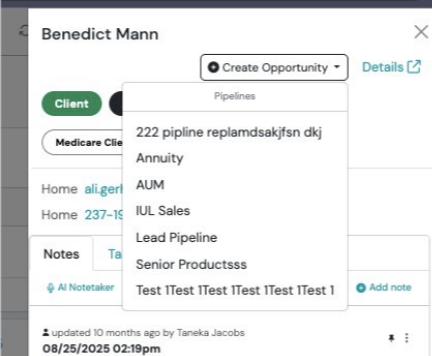
- In the Preview header, click Create Opportunity.
- If multiple pipelines are configured, select the desired pipeline from the dropdown.
- The New Opportunity form will open with the contact already selected.
- Complete the New Opportunity form.
- Click Save.
Adding Opportunities to Contacts
Section titled “Adding Opportunities to Contacts”- From the left side Main Menu, navigate to Contacts (or the Clients and/or Leads) tab.
- Search and select the desired contact record to open and edit.
- From the respective contact record page > click the Opportunities accordion.
- Click +New Opportunity button.
- If multiple pipelines configured, select the desired Pipeline (otherwise, skip this step).
- New Opportunity form slide out window appears.
- Complete New Opportunity form
- Click Save button.
Add Opportunities from the Leads Tab
Section titled “Add Opportunities from the Leads Tab”- From the left side Main Menu, navigate to the Leads tab.
- Locate the desired lead and > click the Opportunity button (trophy icon) to the right
- If multiple pipelines configured, select the desired Pipeline (otherwise, skip this step).
- New Opportunity form slide out window appears.
- Complete New Opportunity form
- Click Save button.
Adding Opportunities from the Opportunity View
Section titled “Adding Opportunities from the Opportunity View”- From the left side Main Menu, navigate to the Opportunities tab.
- Click the +Create Opportunity button and select the desired Pipeline
- Complete New Opportunity form
- Click Save button.
Creating Opportunities Directly from an Event
Section titled “Creating Opportunities Directly from an Event”- From the left side Main Menu, navigate to Marketing
- In the Open Events tile, < click into the desired event to go to the Event Show Page
- The Registered tile will display all contacts who have been registered for this event.
- Once you have located the desired contact to create an opportunity for, < click the Trophy Icon (Opportunity Button)
- New Opportunity form slide out window appears.
- Complete New Opportunity form
- Click Save button.
Creating Opportunities Directly from an Appointment
Section titled “Creating Opportunities Directly from an Appointment”- From the left side Main Menu, navigate to Contacts (or the Clients and/or Leads) tab.
- Search and select the desired contact record to open and edit.
- From the respective contact record page > click the Appointments accordion.
- Click the Trophy Icon (Opportunity button)+New Opportunity button.
- If multiple pipelines configured, select the desired Pipeline (otherwise, skip this step).
- New Opportunity window displays.
- Complete New Opportunity form
- Click Save button.
Editing Opportunities
Section titled “Editing Opportunities”-
Locate the desired opportunity record to edit from either the Contacts page directly, or through the Opportunities View.
-
To the right, click the Action Menu icon > select Edit.
-
Complete Edit Opportunity form pop-up window.
- Contacts
- Opportunity Name if left blank, the opportunity name will be an autogenerate series of numbers beginning with OPP- (ex. OPP-B16A8DEE83)
- Description optional
- Agent
- Stage
- Staged On
- Amount/Premium optional
- Est. Close Date optional
- Lead Source
- Next Step optional
- Tags optional
- Opportunity Note optional
- Origin Event optional
- Origin Appointment optional
- Origin Appointment optional
-
Click the Save button.
Advancing Opportunities
Section titled “Advancing Opportunities”After you’ve created an opportunity, you will want to update the Sales Stage to track the contact’s progression through through your sales process.
- From an opportunity record, click Advance Sales Stage button.
- Complete Sales Stage form pop-up window.
- Click Save button.
Associating Products to Opportunities
Section titled “Associating Products to Opportunities”-
Once you’ve created an opportunity, from the opportunity record > click +Product.
-
New Product form pop-up window appears.
-
Complete New Product form
- Institution
- Product
- Agent of Record
- Status
- Status Date
- Plan Type
- Owners Note how the contact is automatically assigned
- Beneficiaries
- Number
- State of Business
- Opportunity pre-filled by default
-
Click Save.
Associate Existing Opportunities to Products
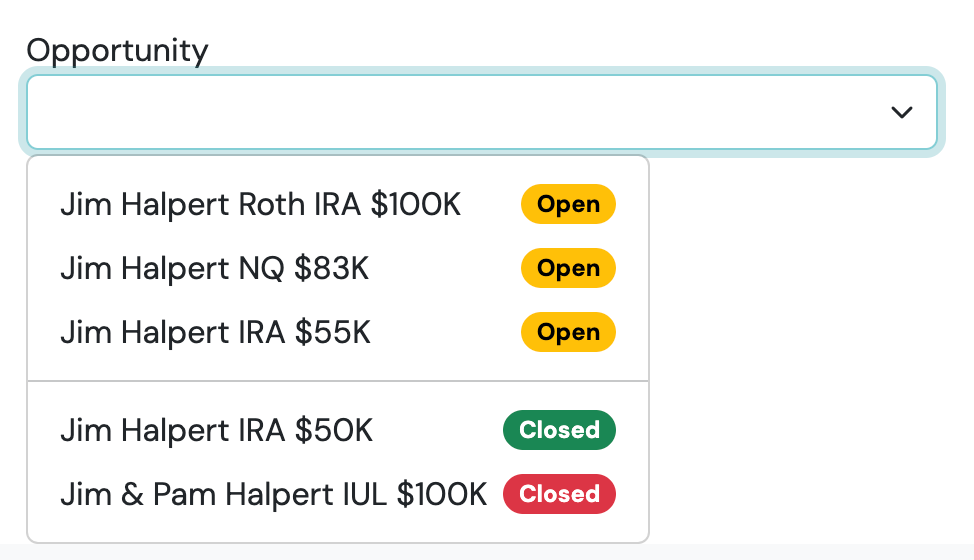
Section titled “Associate Existing Opportunities to Products”To associate an opportunity to a product, navigate to the Opportunity field on the New Product Form, or by editing an existing product, and select the desired Opportunity from the drop-down list. The dropdown options will only display existing open and closed opportunities associated to a given contact.
Definitions
Section titled “Definitions”| Field Name | Definition |
|---|---|
| Contacts | The contact(s) associated to a given opportunity. |
| Opportunity Name | The name of an opportunity. |
| Description | Additional details of the opportunity. |
| Agent | Identifies the agent assigned to a given opportunity. |
| Stage | Identifies the current sales stage for a given opportunity. |
| Staged On | The effective date for the current sales stage. |
| Amount/Premium | Identifies the estimated purchase amount. |
| Est. Close Date | The projected close date for the opportunity. |
| Lead Source | The lead source for the associated opportunity. Note: The drop-down will display all configured lead sources. To learn how to add additional lead sources, visit the Lead Sources article. |
| Next Step | Identifies the next action required to move the opportunity forward. |
| Tags | Create and/or add tags associated to the opportunity. |
| Opportunity Note | Provides any helpful details about the opportunity. |
| Origin Event | Identifies an event associated to a given opportunity. |
| Origin Appointment | Identifies an appointment associated to a given opportunity. |
How to Move Opportunities Between Different Pipelines
Section titled “How to Move Opportunities Between Different Pipelines”- Navigate to Opportunities from the left-hand main navigation menu.
- In Opportunities < click into the opportunity you want to move
- The Opportunity show page will display and from here > Click the three-dot Action Menu (not the edit button) and select Change Pipeline.
- Select the desired pipeline in the drop-down field.
- Click Save button.